

Seamly2D Qt Development Internship南京图灵 Seamly2D 开发实习
In a three-week internship, I brought an unfamiliar Qt codebase into operation, added local accounts and role management, and prepared a Windows installer and an unsigned macOS package for review and handoff.三周实习里,我从配置 Qt、编译陌生代码库开始,为 Seamly2D 加入本地账户和角色管理,再完成 Windows 安装包与 macOS 无签名包的演示和交接。
- Timeline时间线
- 2025.082025.08
- Status状态
- Completed已完成
- Stack技术栈
- QtC++CMakePackagingInternship

Joining the Seamly2D Project进入 Seamly2D
After the 2025 National Undergraduate Electronics Design Contest, I stayed in Nanjing for a three-week full-time internship. I had expected to encounter UI work for embedded devices. The actual assignment involved Seamly2D, a large C++ and Qt patternmaking application. My prior experience was an introductory university C++ course, mostly in the terminal; both Qt and a collaborative codebase were new territory.
2025 年全国大学生电子设计竞赛结束后,我留在南京,开始了三周全职实习。我原先以为会接触嵌入式设备的 UI,真正要改的却是 Seamly2D,一个 C++ 与 Qt 编写的大型服装纸样软件。此前我只上过学校的 C++ 入门课,程序基本还停在命令行,Qt 和多人协作仓库都要现学。
The company wanted to assess further development on the application. My task was to add local registration, login, and role management before the main interface, then build, package, and hand off the modified version. The supervising engineer assigned daily work, and I reported back after completing it. By the end of three weeks, someone else needed to be able to install, open, and inspect my changes.
公司想验证继续二次开发的可行性。我接到的任务是在主界面前加入本地注册、登录和角色管理,再把修改版构建、打包并交接。带教工程师每天给任务,我完成后汇报。三周的终点很具体,要让别人能够安装、打开并检查我的改动。
Environment and Build环境与构建
The first day disappeared into downloading. After three hours against the overseas server, the Qt Online Installer was about 10 percent complete. I assumed large software simply took that long and waited for much of the day. The next morning, the engineer mentioned the Tsinghua mirror; the remaining installation finished in a little over an hour. Reading the TUNA Qt mirror guide later made that patient first day seem rather funny.
第一天先耗在下载上。Qt 在线安装器连海外服务器,三个小时大约下了 10%,我还以为大软件本来就这么慢,老老实实等了大半天。第二天工程师告诉我可以换清华镜像,剩余安装一个多小时就结束了。后来看到 TUNA 的 Qt 镜像说明,再想起那一天,多少有点好笑。
Installation did not immediately produce a working build. I began with Qt 5.15.2 and made core5compat conditional, which let qmake pass, only for compilation to report more than thirty errors. The branch already used Qt 6 headers and APIs. Extending Qt 5 compatibility would have pulled me away from the assignment, so I installed Qt 6.5.3 MSVC2019 64-bit and Qt 5 Compatibility Module with the v142 compiler. Deleting the old build directory and Seamly2D.pro.user, then configuring the Kit again, finally produced a complete build.
装好也没马上能用。最初我选 Qt 5.15.2,把 core5compat 改为条件加载后,qmake 通过,完整编译却继续报三十多个错误。当前分支已经用了 Qt 6 的头文件和 API,继续补 Qt 5 兼容会偏离这次任务。我改用 Qt 6.5.3 MSVC2019 64-bit、Qt 5 Compatibility Module 与 v142 编译器,删除旧 build 目录和 Seamly2D.pro.user,重新配置 Kit,才把完整构建跑通。
That process taught me to check the branch, Qt package, compiler, and architecture together. GitHub had previously been somewhere to download code. During the internship I practiced clone, branch switching, commit, push, merge, pull requests, forks, and tags as ways to preserve and exchange actual work. The original first-run record retains the environment setup and specific error handling.
这段排查让我开始把分支、Qt 包、编译器和架构放在一起核对。此前我把 GitHub 当成下载代码的地方,这次才实际练习 clone、切分支、commit、push、merge、pull request、fork 与 tag,用 Git 保存和交接自己的改动。首跑原始记录保留了环境配置与具体报错处理。
Accounts and Roles账户与角色
With the application running, I added registration and login windows and organized the entry sequence around main(). QSettings persisted account information locally. I replaced early plaintext password comparison with hash storage and verification, masked the password input, and added distinct handling for existing users, missing users, and wrong passwords.
程序启动后,我加入注册、登录窗口,并在 main() 附近整理进入主界面的顺序。账户信息由 QSettings 在本机保存,密码从早期明文比较改成哈希存储与校验,输入框增加遮蔽,再分别处理用户已存在、用户不存在和密码错误。
Using the windows exposed smaller problems that still blocked the feature. Enter activated Cancel, username fields offered suggestions, and the password field could crash with a Chinese input method active. I corrected those behaviors one by one. Role management then shifted my attention from the appearance of a window to which user could act on which account. The first account had to be admin; normal users could not access management; administrators could delete or promote only normal users, with confirmation before deletion; and only admin could demote another administrator.
真正使用界面时,小问题一个也绕不开。回车默认触发取消,用户名框弹联想,密码框在中文输入法状态下发生过闪退,我逐项修正这些行为。到了角色管理,重点又从窗口长什么样,变成谁可以对谁执行什么操作。第一个账号必须是 admin;普通用户看不到管理入口;管理员只能删除或升级普通用户,删除还要二次确认;其他管理员的降级只能由 admin 执行。
I implemented the operations by separating the current user, target user, and permitted state change, then demonstrated them individually.
我把每项操作按当前用户、目标用户和允许的状态变化拆开实现,再逐项演示。
Installation and Another Machine安装与换机
Release work in the third week stalled at windeployqt for about three days. The executable existed on disk but the build could not find it. Reinstallation and path checks were frustrating. I finally exposed Qt's bin directory to Qt Creator's Build Environment and let both .pro files locate the deployment tool through QT_INSTALL_BINS, running it only in Release configuration.
第三周转做 Release,我在 windeployqt 上卡了约三天。工具明明在硬盘里,构建步骤却找不到,重装和查路径的过程确实很烦。最后,我给 Qt Creator 的 Build Environment 补上 Qt bin,并让两个 .pro 文件通过 QT_INSTALL_BINS 定位部署工具,只在 Release 配置执行。
Even with DLLs filling the deployment directory, the application still lacked xerces-c_3_2.dll. I added that XML library before completing Windows self-signing, Inno Setup packaging, installation, and launch. The Qt deployment guide explicitly excludes additional third-party libraries from windeployqt's automatic work. The .sm2d and .smis samples I had read earlier now connected to a concrete runtime dependency on an XML parser.
部署目录里已经堆满 DLL,程序还缺 xerces-c_3_2.dll。我补上这个 XML 库,才继续完成 Windows 自签名、Inno Setup 打包、安装与启动。Qt 部署文档也明确提醒,额外第三方库不在 windeployqt 的自动处理范围内。前面读过的 .sm2d、.smis 样例,这时与程序需要的 XML 解析依赖对上了。
I also kept CMake and build-logic study material to distinguish generators, compilers, linkers, and runtime dependencies, while the Seamly2D project on my desk continued to use qmake. The original packaging record and XML samples contain the detailed procedures and data.
我同期整理过 CMake 与编译原理资料,用来分清生成器、编译器、链接器和运行时依赖,手上的 Seamly2D 则一直使用 qmake。打包原始记录与 XML 样例里有操作和数据细节。
Formal Windows installation and feature checks took place on the development machine. About two weeks after the internship, I also tested the installer on a newly installed Windows desktop at home with neither Qt nor Visual Studio present. Registration, login, and role operations worked.
实习正式验收时,Windows 安装与功能检查都在开发机上进行。结束约半个月后,我又在家中一台新装的 Windows 台式机上补测,那台电脑没有 Qt 和 Visual Studio。运行安装程序后,注册、登录和角色功能都能实际操作。
Mac and HandoffMac 与交接
I moved the same source to my Mac, reworked the Qt paths, architecture, and Kit, and brought up both Debug and Release. After collecting dependencies with macdeployqt, the application launched; I also generated and opened an unsigned DMG on that machine, with the supervising engineer watching the demonstration. I then created a self-signed certificate and tried the codesign, spctl, and packaging sequence. Application signing did not finish.
我也把同一份源码迁到自己的 Mac,重新处理 Qt 路径、架构与 Kit,跑通 Debug 和 Release,再用 macdeployqt 收集依赖。应用能够启动,无签名 DMG 也生成并在这台 Mac 上打开过,带教工程师现场看了演示。随后我创建自签名证书,尝试 codesign、spctl 与打包脚本,应用签名没有做完。
At the final review, the engineer checked registration, login, roles, Windows installation, and the Mac demonstration, and made a point of praising my progress over the three weeks. The source, weekly logs, environment notes, and scripts went into the company's intern develop branch. I was very excited. For the first time, I had entered an unfamiliar large codebase, completed real changes, and handed them to someone else for inspection.
最后,工程师检查了注册登录、角色管理、Windows 安装和 Mac 演示,还认真肯定了我三周里的进步。源码、周日志、环境文档和脚本提交到了公司的实习生 develop 分支。我当时非常兴奋,第一次确认自己能进入陌生的大型代码库,完成一组实际修改,再交给别人检查。
Development Notes开发笔记
Debugging records and technical notes tied to the decisions and artifacts on this project page.与这个项目页面中的设计决策和工程材料直接关联的调试记录与技术笔记。
Public Project Files公开项目资料
Uploaded evidence served from the public asset folder. Use the file index to preview documents, source code, media, PDFs, and downloadable artifacts without leaving the page.这里列出已经上传到公开目录的项目证据。可以在左侧索引里选择文件,在右侧直接预览文档、源码、媒体、PDF 和可下载附件。
auth-role-snippet.cpp
C++ / 705 B
// Public excerpt from the Seamly2D internship add-on.
// It shows the local role model only; full source and build outputs are not republished here.

namespace AuthUtils {

enum class Role {
    User,
    Admin
};

Role roleOf(const QString& username)
{
    if (username.compare(QStringLiteral("admin"), Qt::CaseInsensitive) == 0) {
        return Role::Admin;
    }

    QSettings settings;
    settings.beginGroup(QStringLiteral("Auth/users/%1").arg(username));
    const QString role = settings.value(QStringLiteral("role")).toString();
    settings.endGroup();

    if (role.compare(QStringLiteral("admin"), Qt::CaseInsensitive) == 0) {
        return Role::Admin;
    }

    return Role::User;
}

}
Related Media相关媒体
Board photos, schematic sheets, videos, and test captures that show this project at specific stages.展示这个项目具体阶段的板卡照片、原理图分页、视频和测试截图。
The upstream application behind the internship这段实习所基于的 Seamly2D 上游项目
Seamly2D is the open-source patternmaking application I brought up, extended with a local account layer, and packaged during the three-week Qt internship; the upstream software and wordmark are not my work.三周 Qt 实习围绕 Seamly2D 展开。我跑通上游工程、加入本地账户层并尝试打包;软件本体与项目标识并非我的作品。

Three weeks of full-time Qt development in Nanjing南京三周全职 Qt 实习
The portfolio cover places the work in its Nanjing internship context. The institute mark is existing institutional material, not a personal logo design.这张封面交代南京线下实习背景;研究院标识属于既有机构材料,并非个人 Logo 设计。

The Qt Kit that finally matched the source终于与源码配对的 Qt Kit
The first full build worked only after Qt 6.5.3 MSVC2019 64-bit, the v142 compiler, qmake, architecture, and Kit selection agreed. The Qt mark itself is upstream brand material.Qt 6.5.3 MSVC2019 64-bit、v142 编译器、qmake、架构与 Kit 对齐后,完整构建才通过;Qt 标识本身属于上游品牌材料。
CMake study beside a qmake project在 qmake 项目旁展开的 CMake 学习
I studied CMake, generators, toolchains, and package discovery in parallel while Seamly2D itself remained on qmake; the CMake mark is upstream brand material.我并行学习了 CMake、生成器、工具链与包发现,但 Seamly2D 本身始终使用 qmake;CMake 标识属于上游品牌材料。
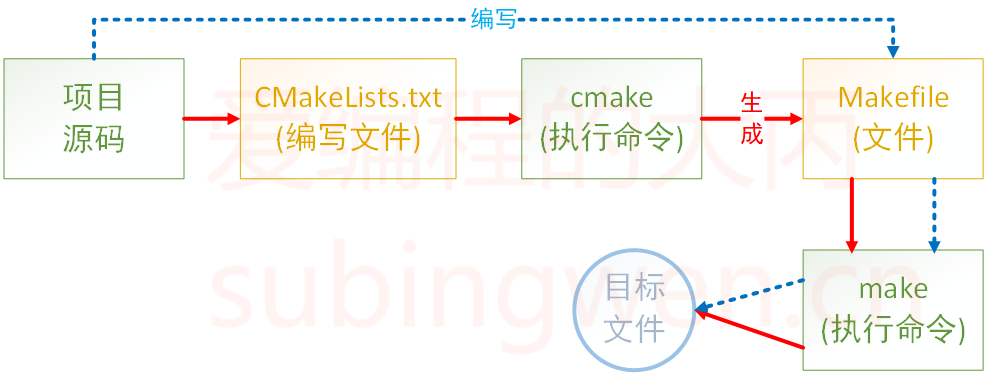
Separating rule generation from build execution把规则生成与构建执行分开
This upstream tutorial diagram helped separate CMake's generation of a Makefile from make's execution of the resulting rules; it was saved as study material, not drawn by me.这张上游教程图把 CMake 生成 Makefile 与 make 执行规则分开表示;它是我保存的学习资料,并非个人绘图。
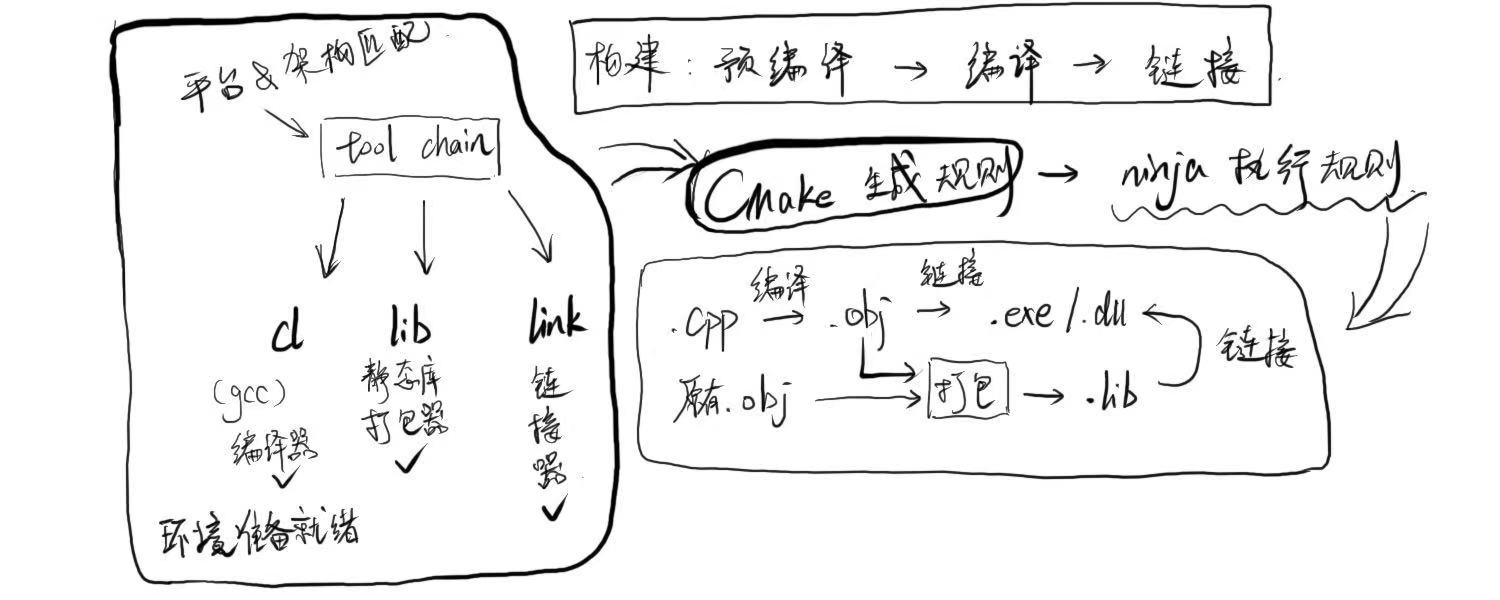
Build-toolchain archive sketch构建工具链档案草图
A handwritten sketch preserved in the internship archive groups toolchain setup, CMake/Ninja rules, and compiler/linker outputs; the file does not identify its author.实习档案中保留的手绘草图,把工具链配置、CMake/Ninja 规则与编译器/链接器产物放在一起;文件没有注明作者。
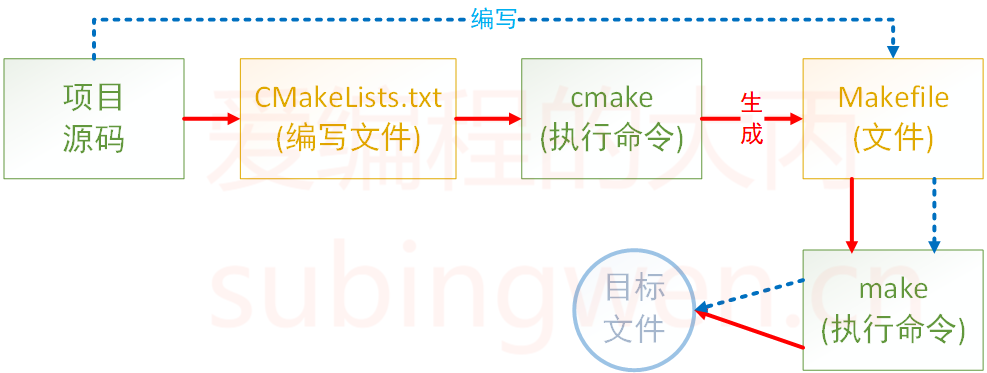
Notion-export copy of the CMake-to-Make tutorial diagramCMake 到 Make 教程图的 Notion 导出副本
The Notion export embeds a copy of the same upstream tutorial diagram shown above; it is a duplicate asset, not a separate CMake flow artifact.Notion 导出嵌入的是上方同一张上游教程图的副本;这是重复资产,不是另一张独立的 CMake 流程图。
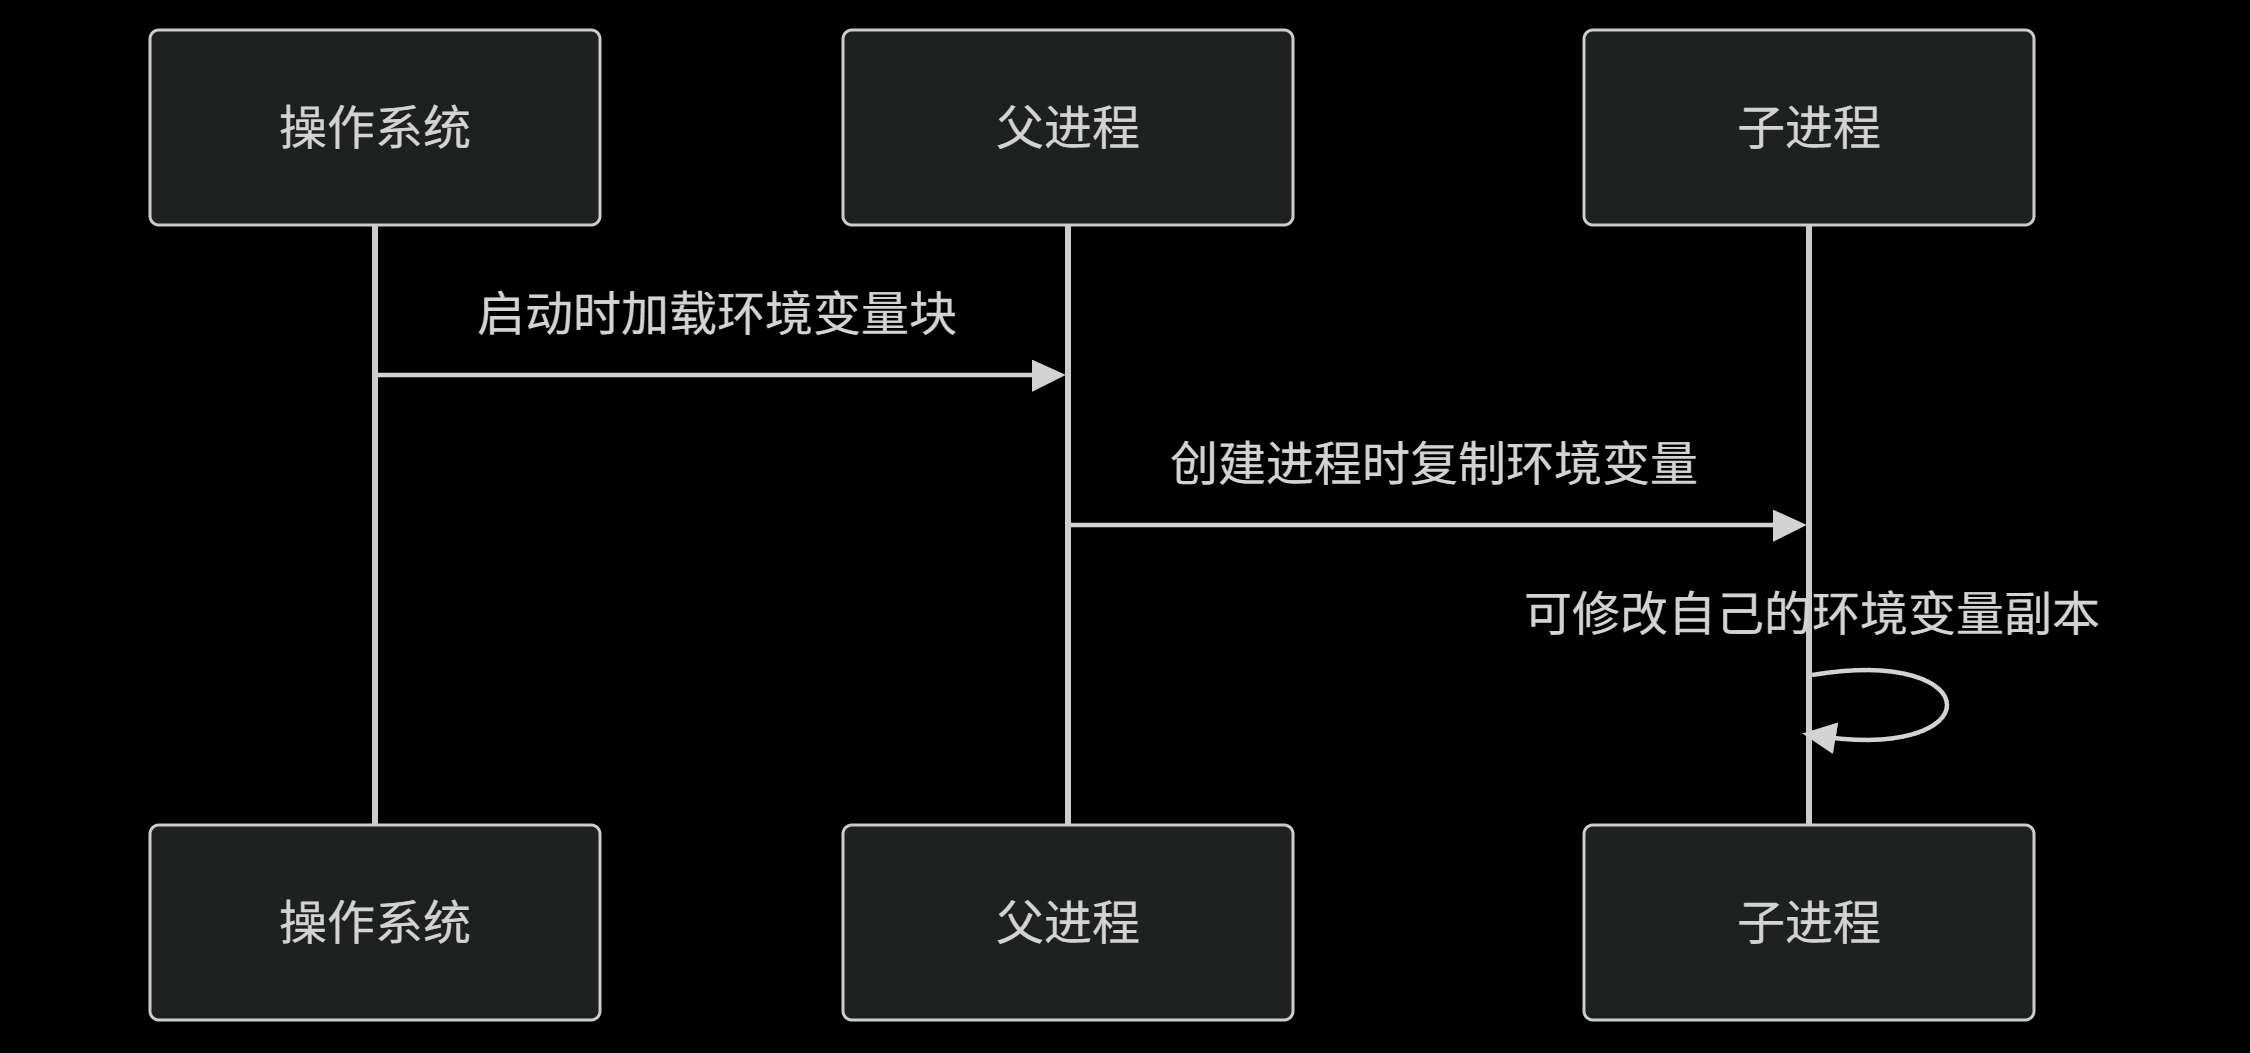
Parent-child environment-variable flow父子进程的环境变量流向
One DeepSeek-generated Mermaid export in the Notion build note shows environment variables loading into a parent process, then being copied to a child process.Notion 编译笔记中的 DeepSeek 生成 Mermaid 图,表示环境变量进入父进程后再复制给子进程。
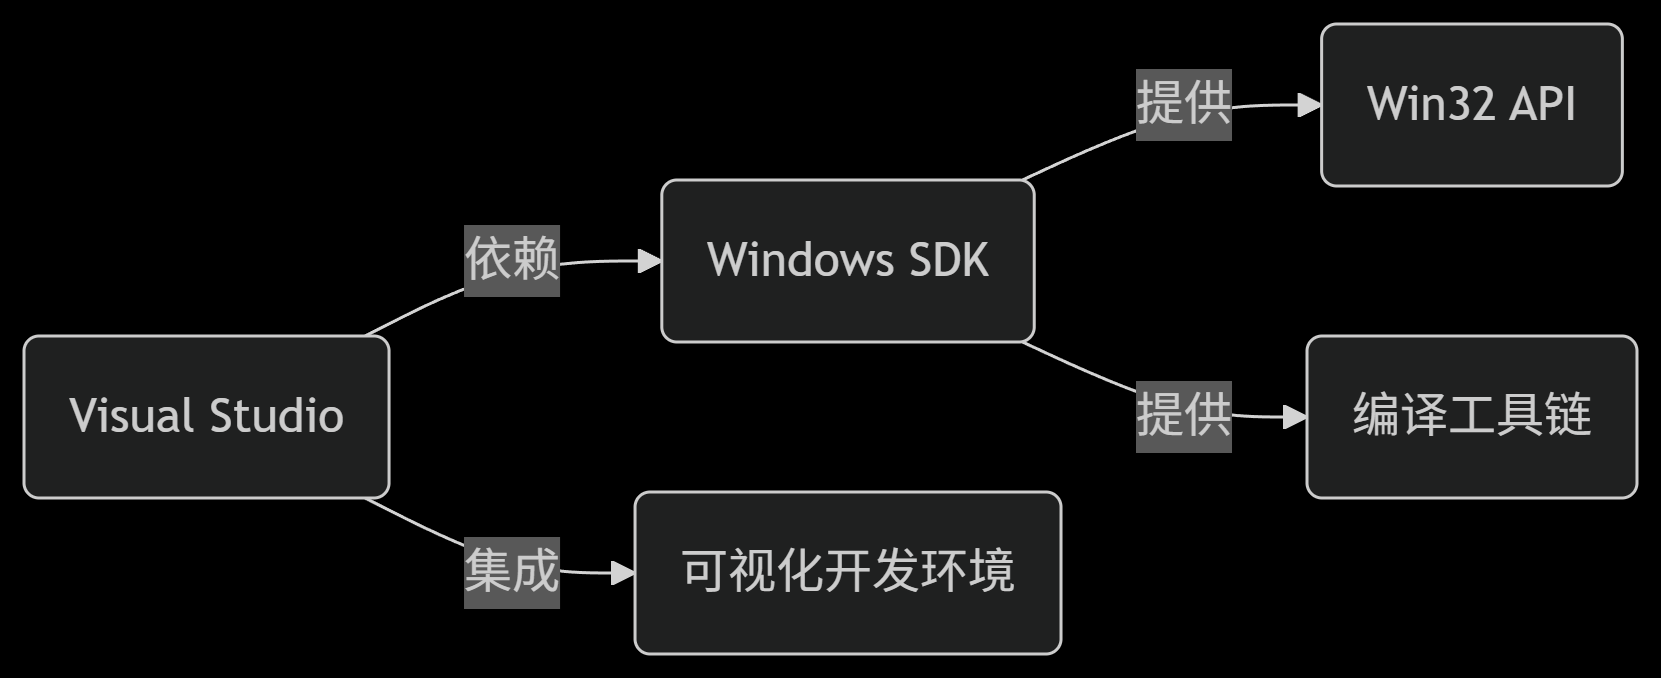
Visual Studio, Windows SDK, and toolchain mapVisual Studio、Windows SDK 与工具链关系图
This generated Mermaid map from the Notion note places Visual Studio beside its integrated development environment, Windows SDK, Win32 API, and compiler toolchain.Notion 笔记中的生成式 Mermaid 关系图,把 Visual Studio、集成开发环境、Windows SDK、Win32 API 与编译工具链放在同一张图上。
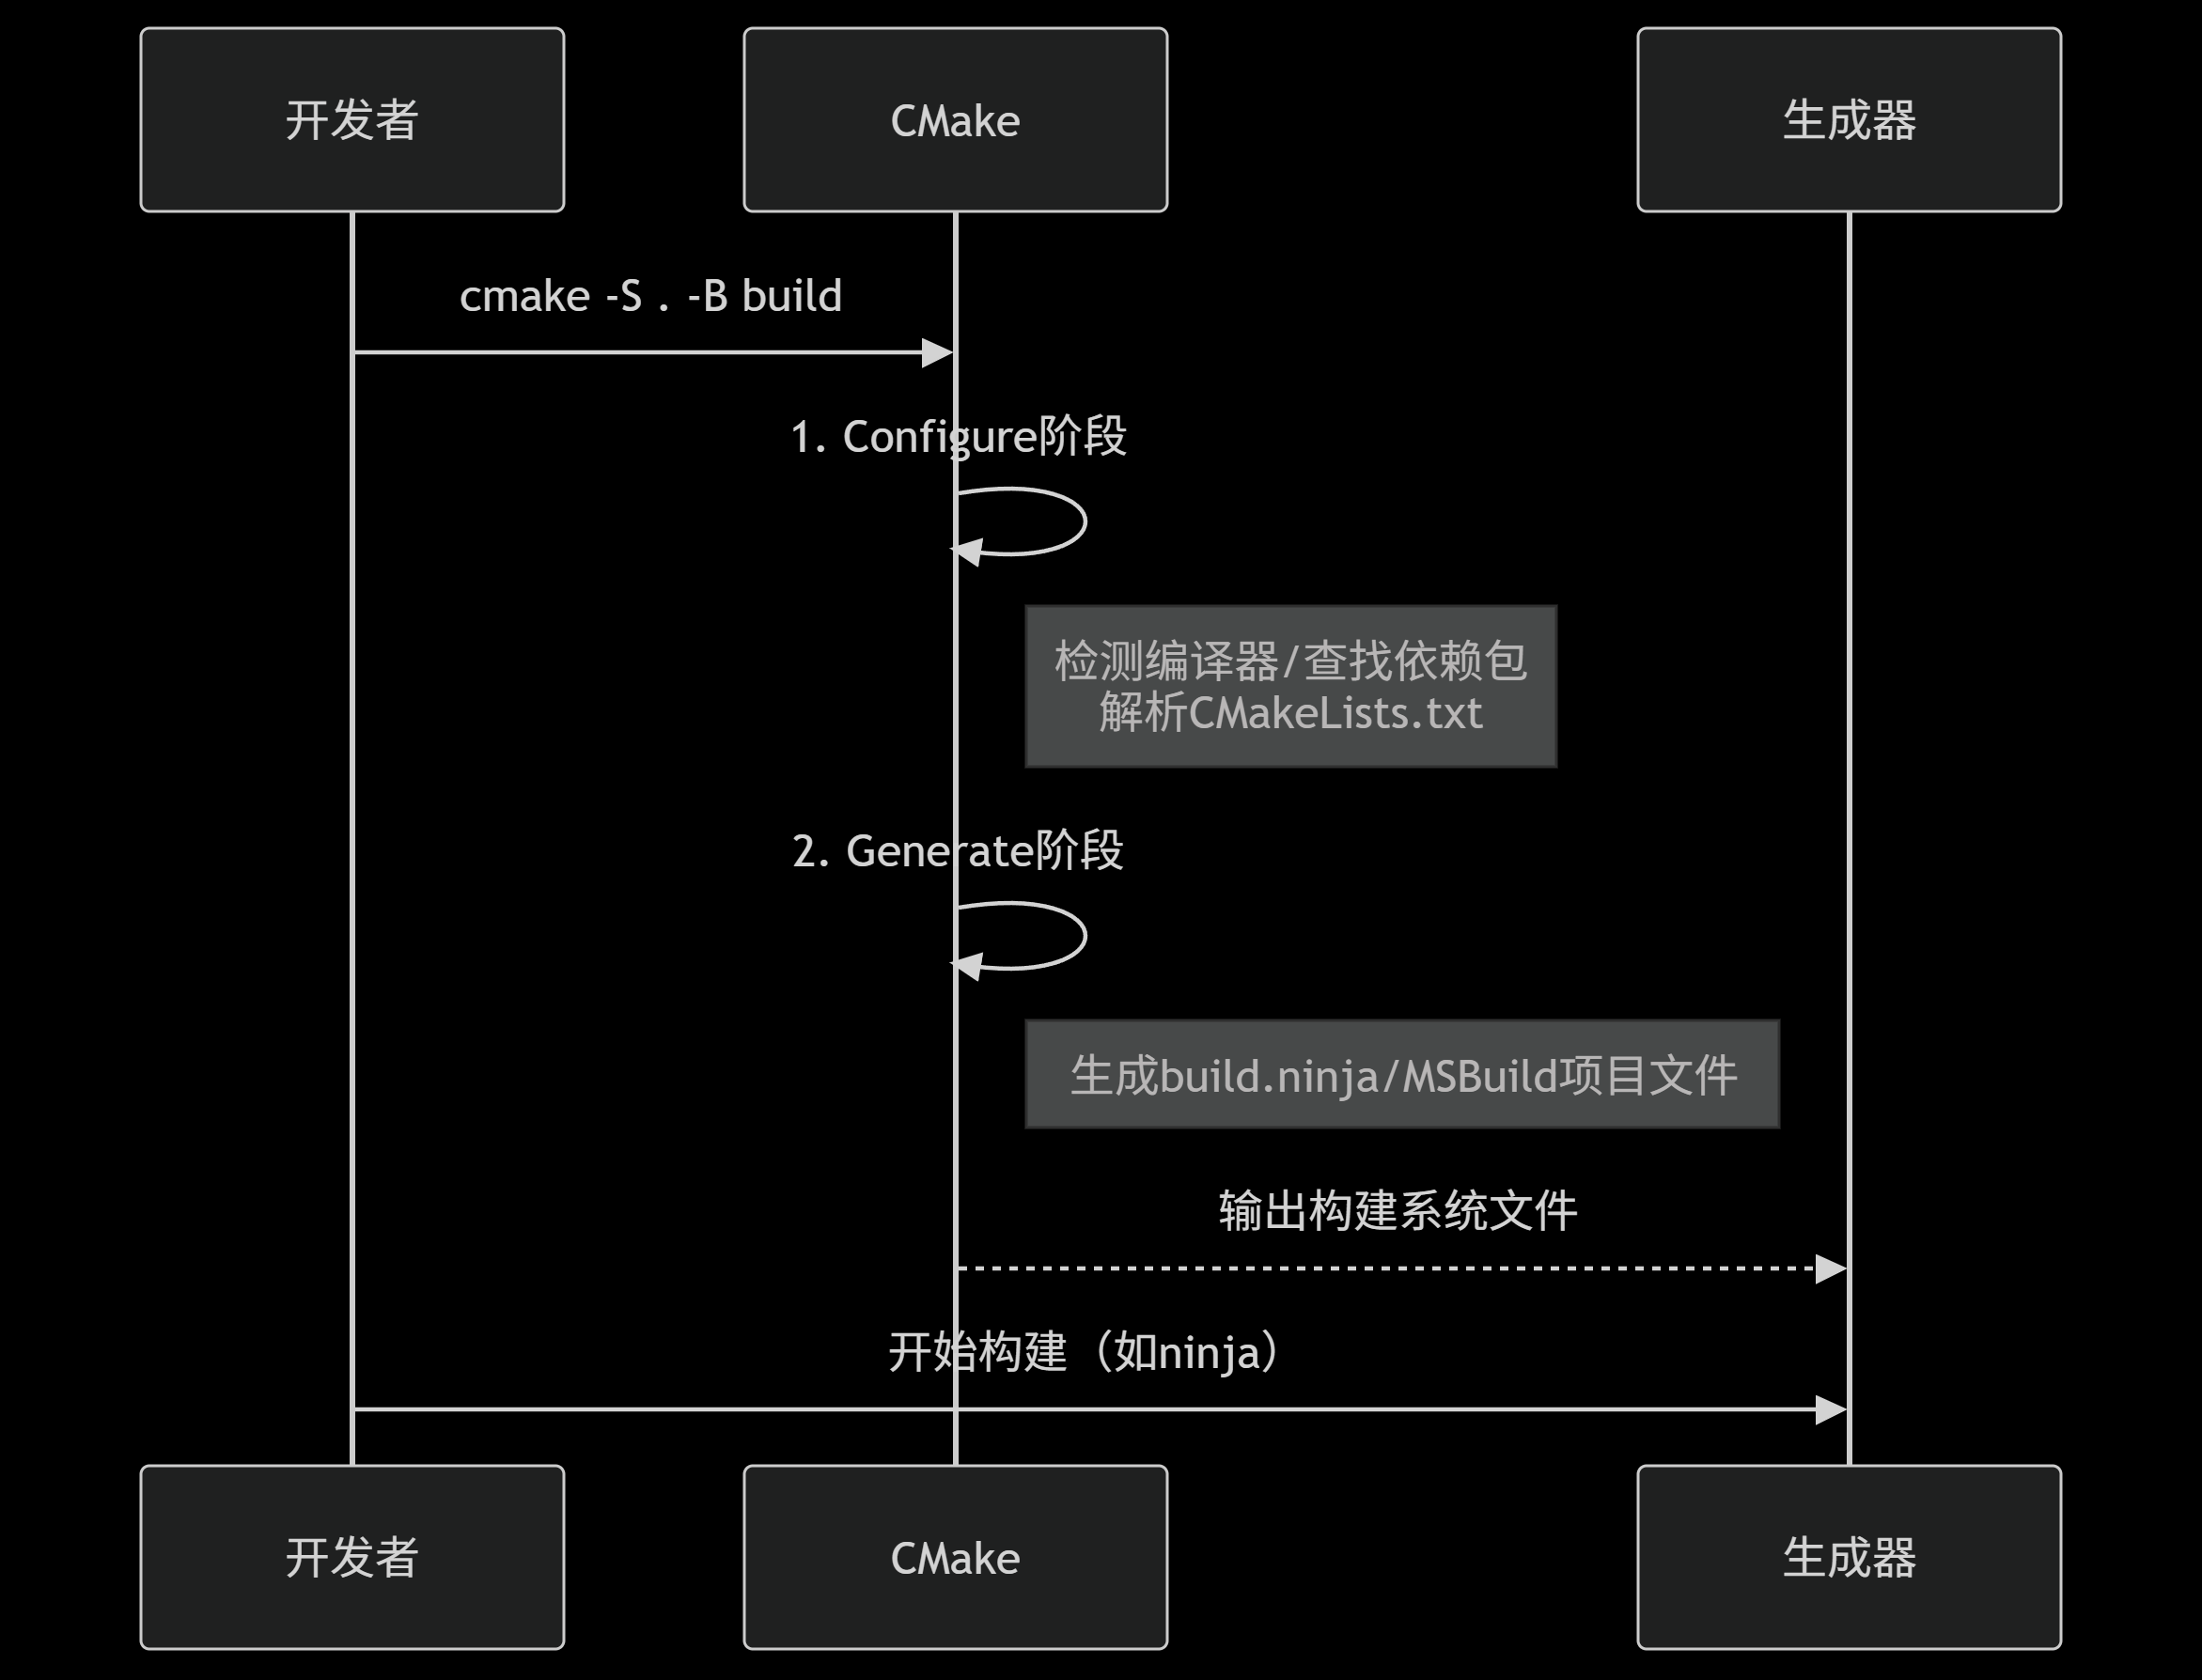
CMake configure-and-generate sequenceCMake 配置与生成阶段时序图
A DeepSeek-generated sequence diagram separates CMake's configure and generate stages before handing the generated build files to a native build tool.DeepSeek 生成的时序图把 CMake 的 Configure 与 Generate 阶段分开,再将生成的构建文件交给本机构建工具执行。
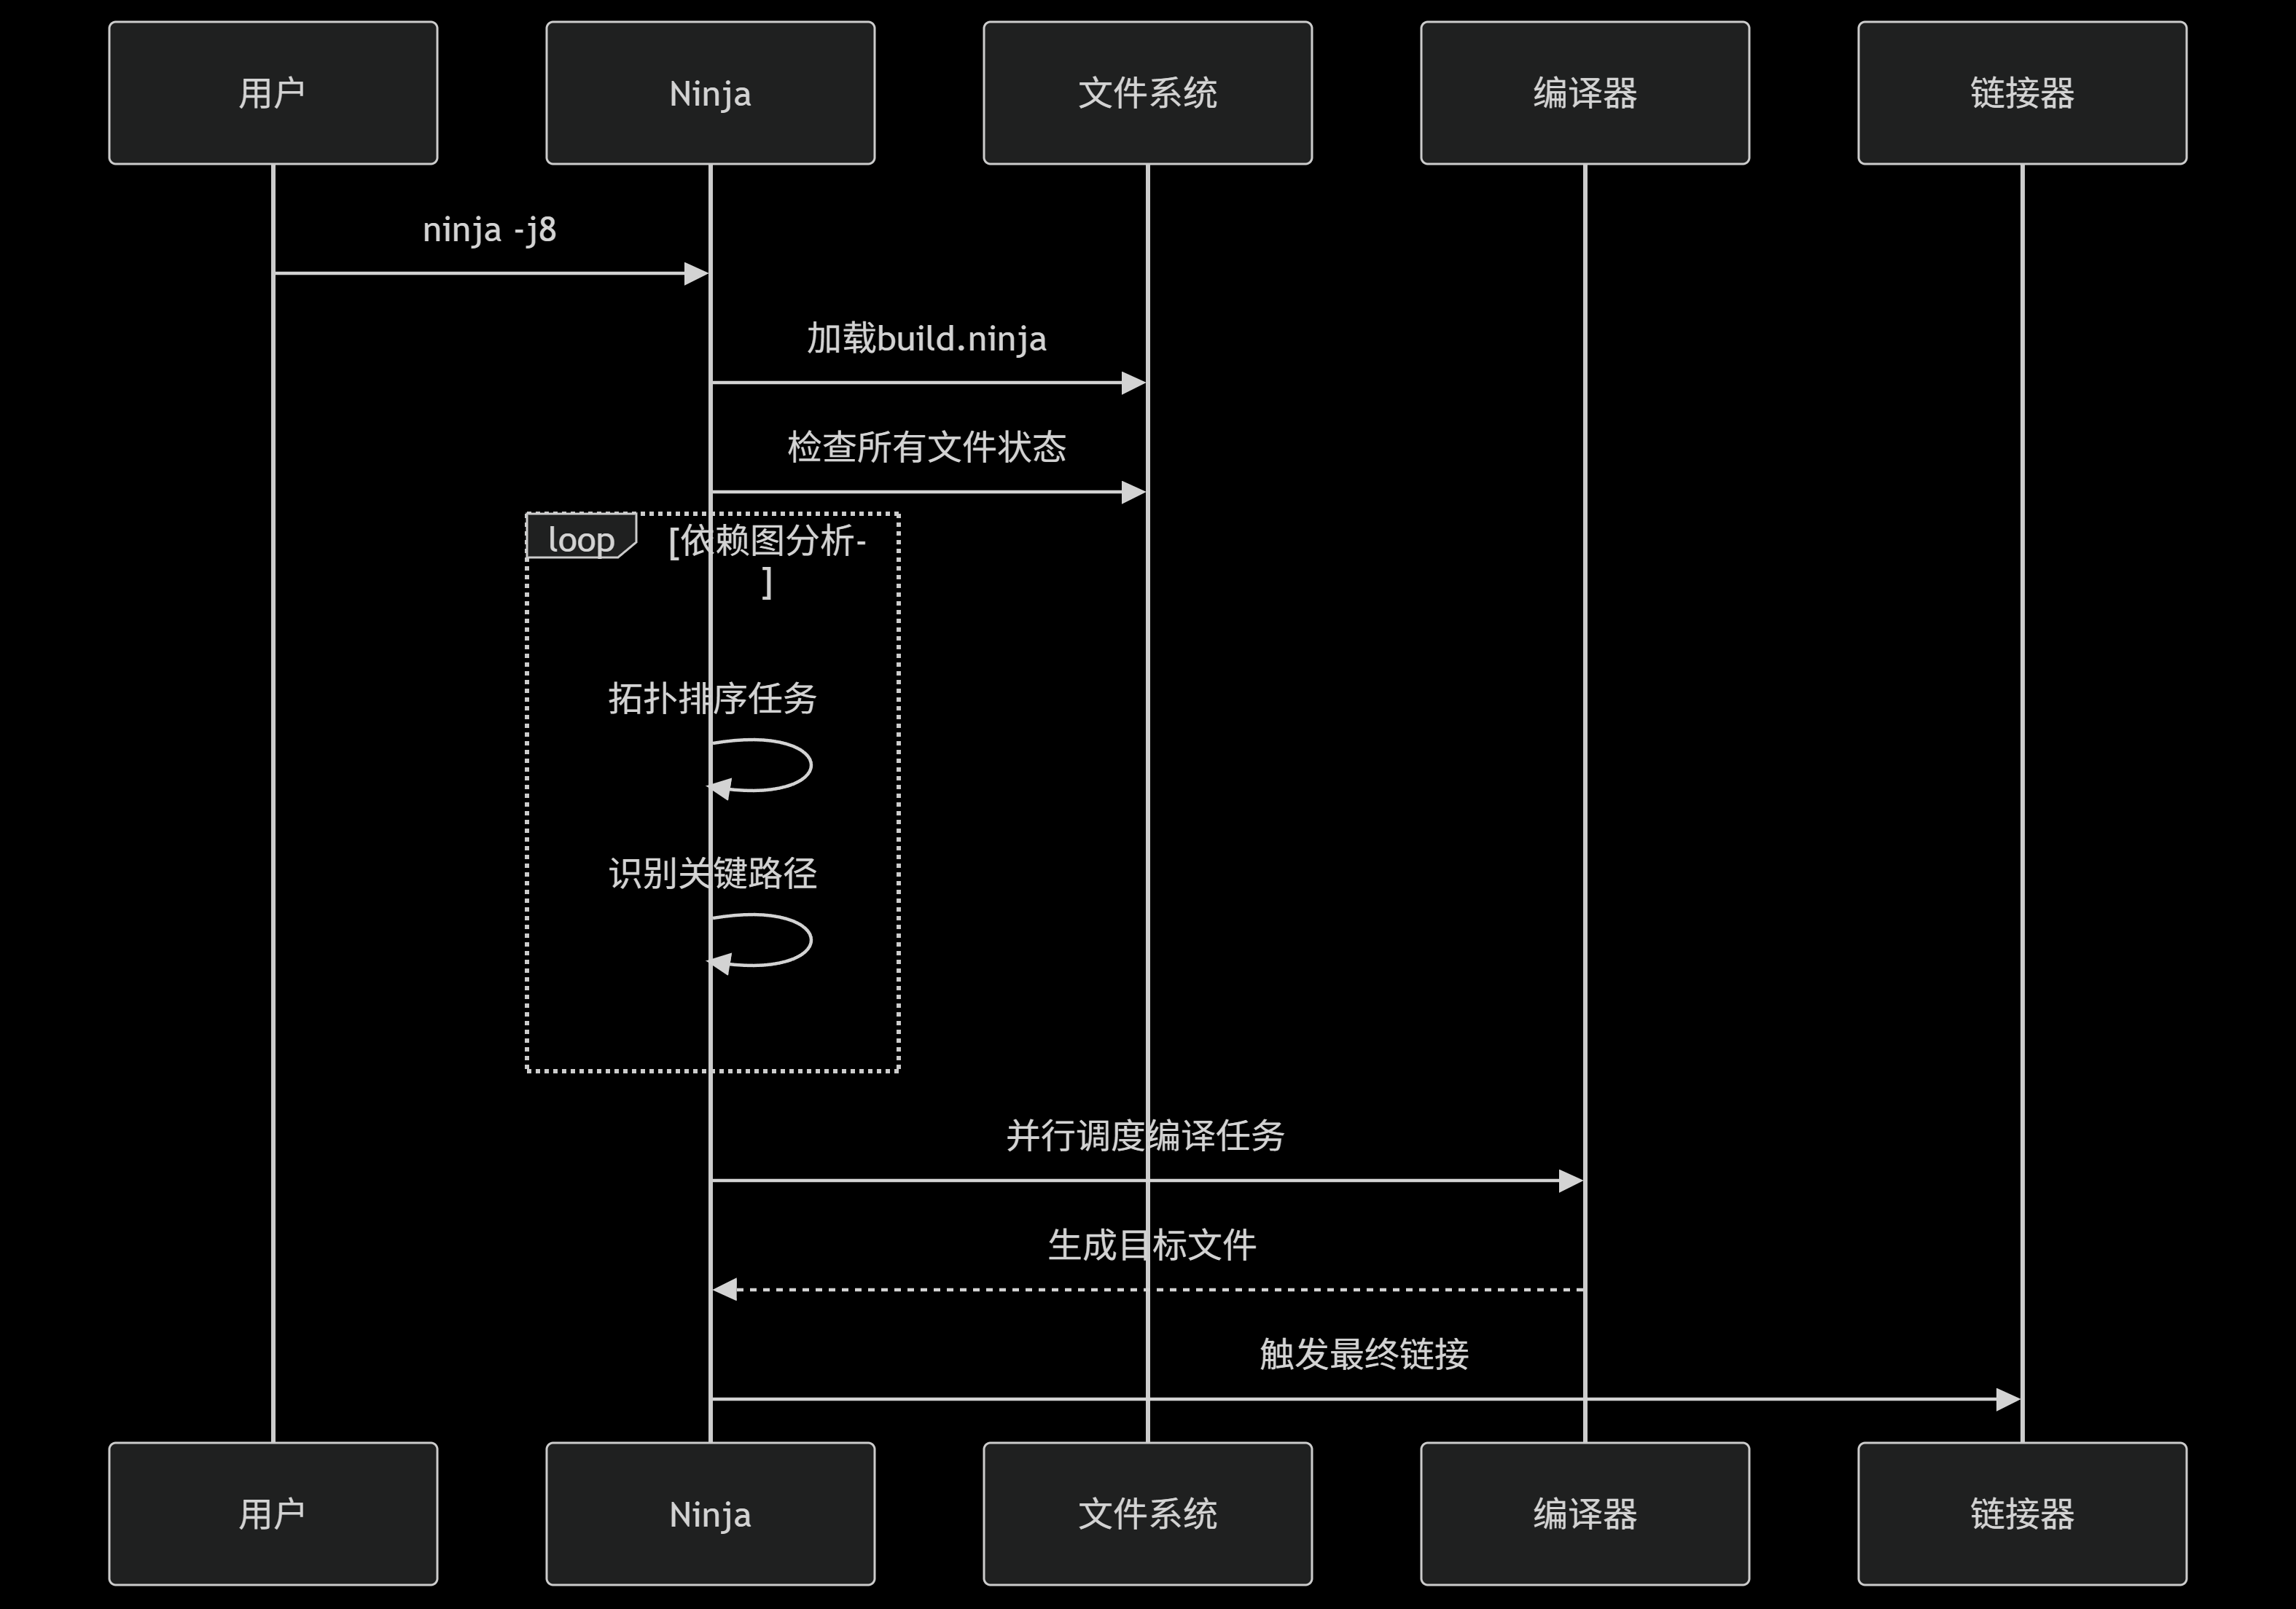
Ninja dependency-scheduling sequenceNinja 依赖调度时序图
The generated sequence follows Ninja as it loads build.ninja, checks files, orders the dependency graph, schedules compile tasks, and invokes the linker.生成式时序图跟随 Ninja 读取 build.ninja、检查文件、排列依赖图、调度编译任务并调用链接器。

CMake rule-generation pathCMake 构建规则生成路径
A compact DeepSeek-generated flow in the source note moves from CMakeLists.txt through project parsing, dependency analysis, platform adaptation, and native build-rule output.原始笔记中的 DeepSeek 生成流程图,从 CMakeLists.txt 依次经过项目解析、依赖分析、平台适配与本机构建规则输出。
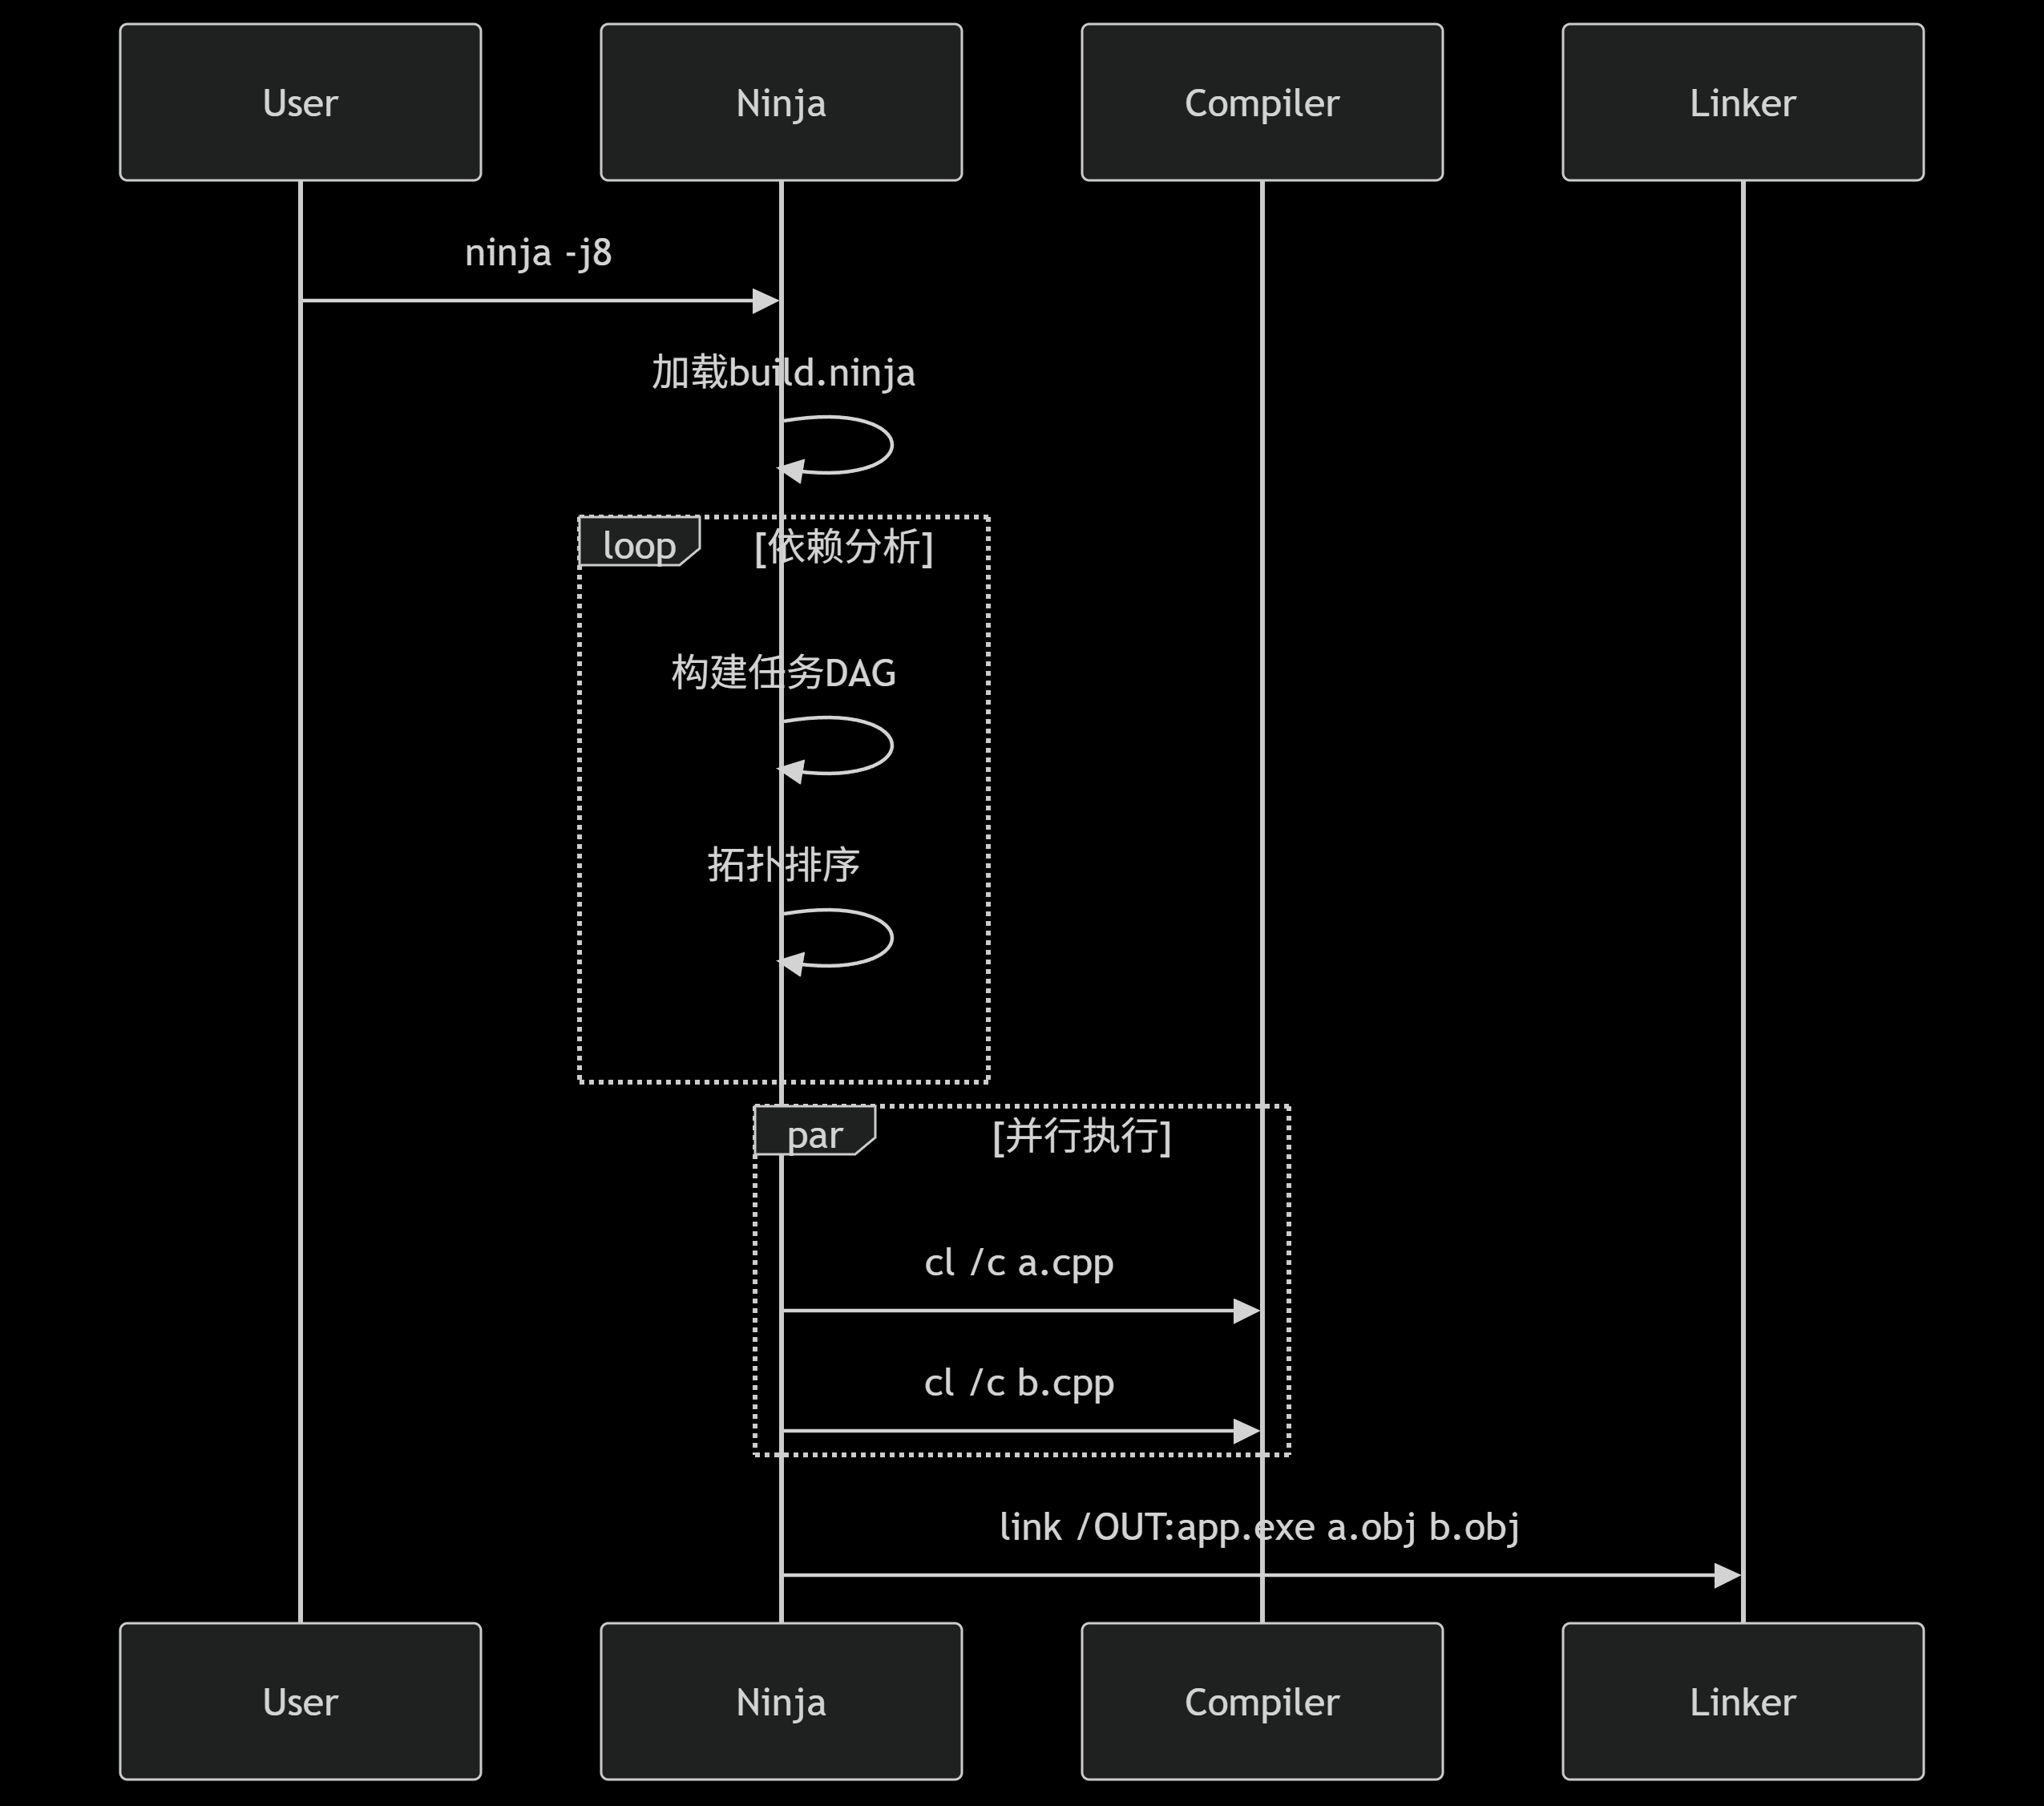
Ninja compile-and-link sequenceNinja 编译与链接时序图
This DeepSeek-generated Mermaid export makes the division visible. Ninja schedules the DAG, compiler jobs produce objects, and the linker emits the executable.DeepSeek 生成的 Mermaid 图把分工画开。Ninja 调度依赖图,编译器生成目标文件,链接器再产出可执行程序。
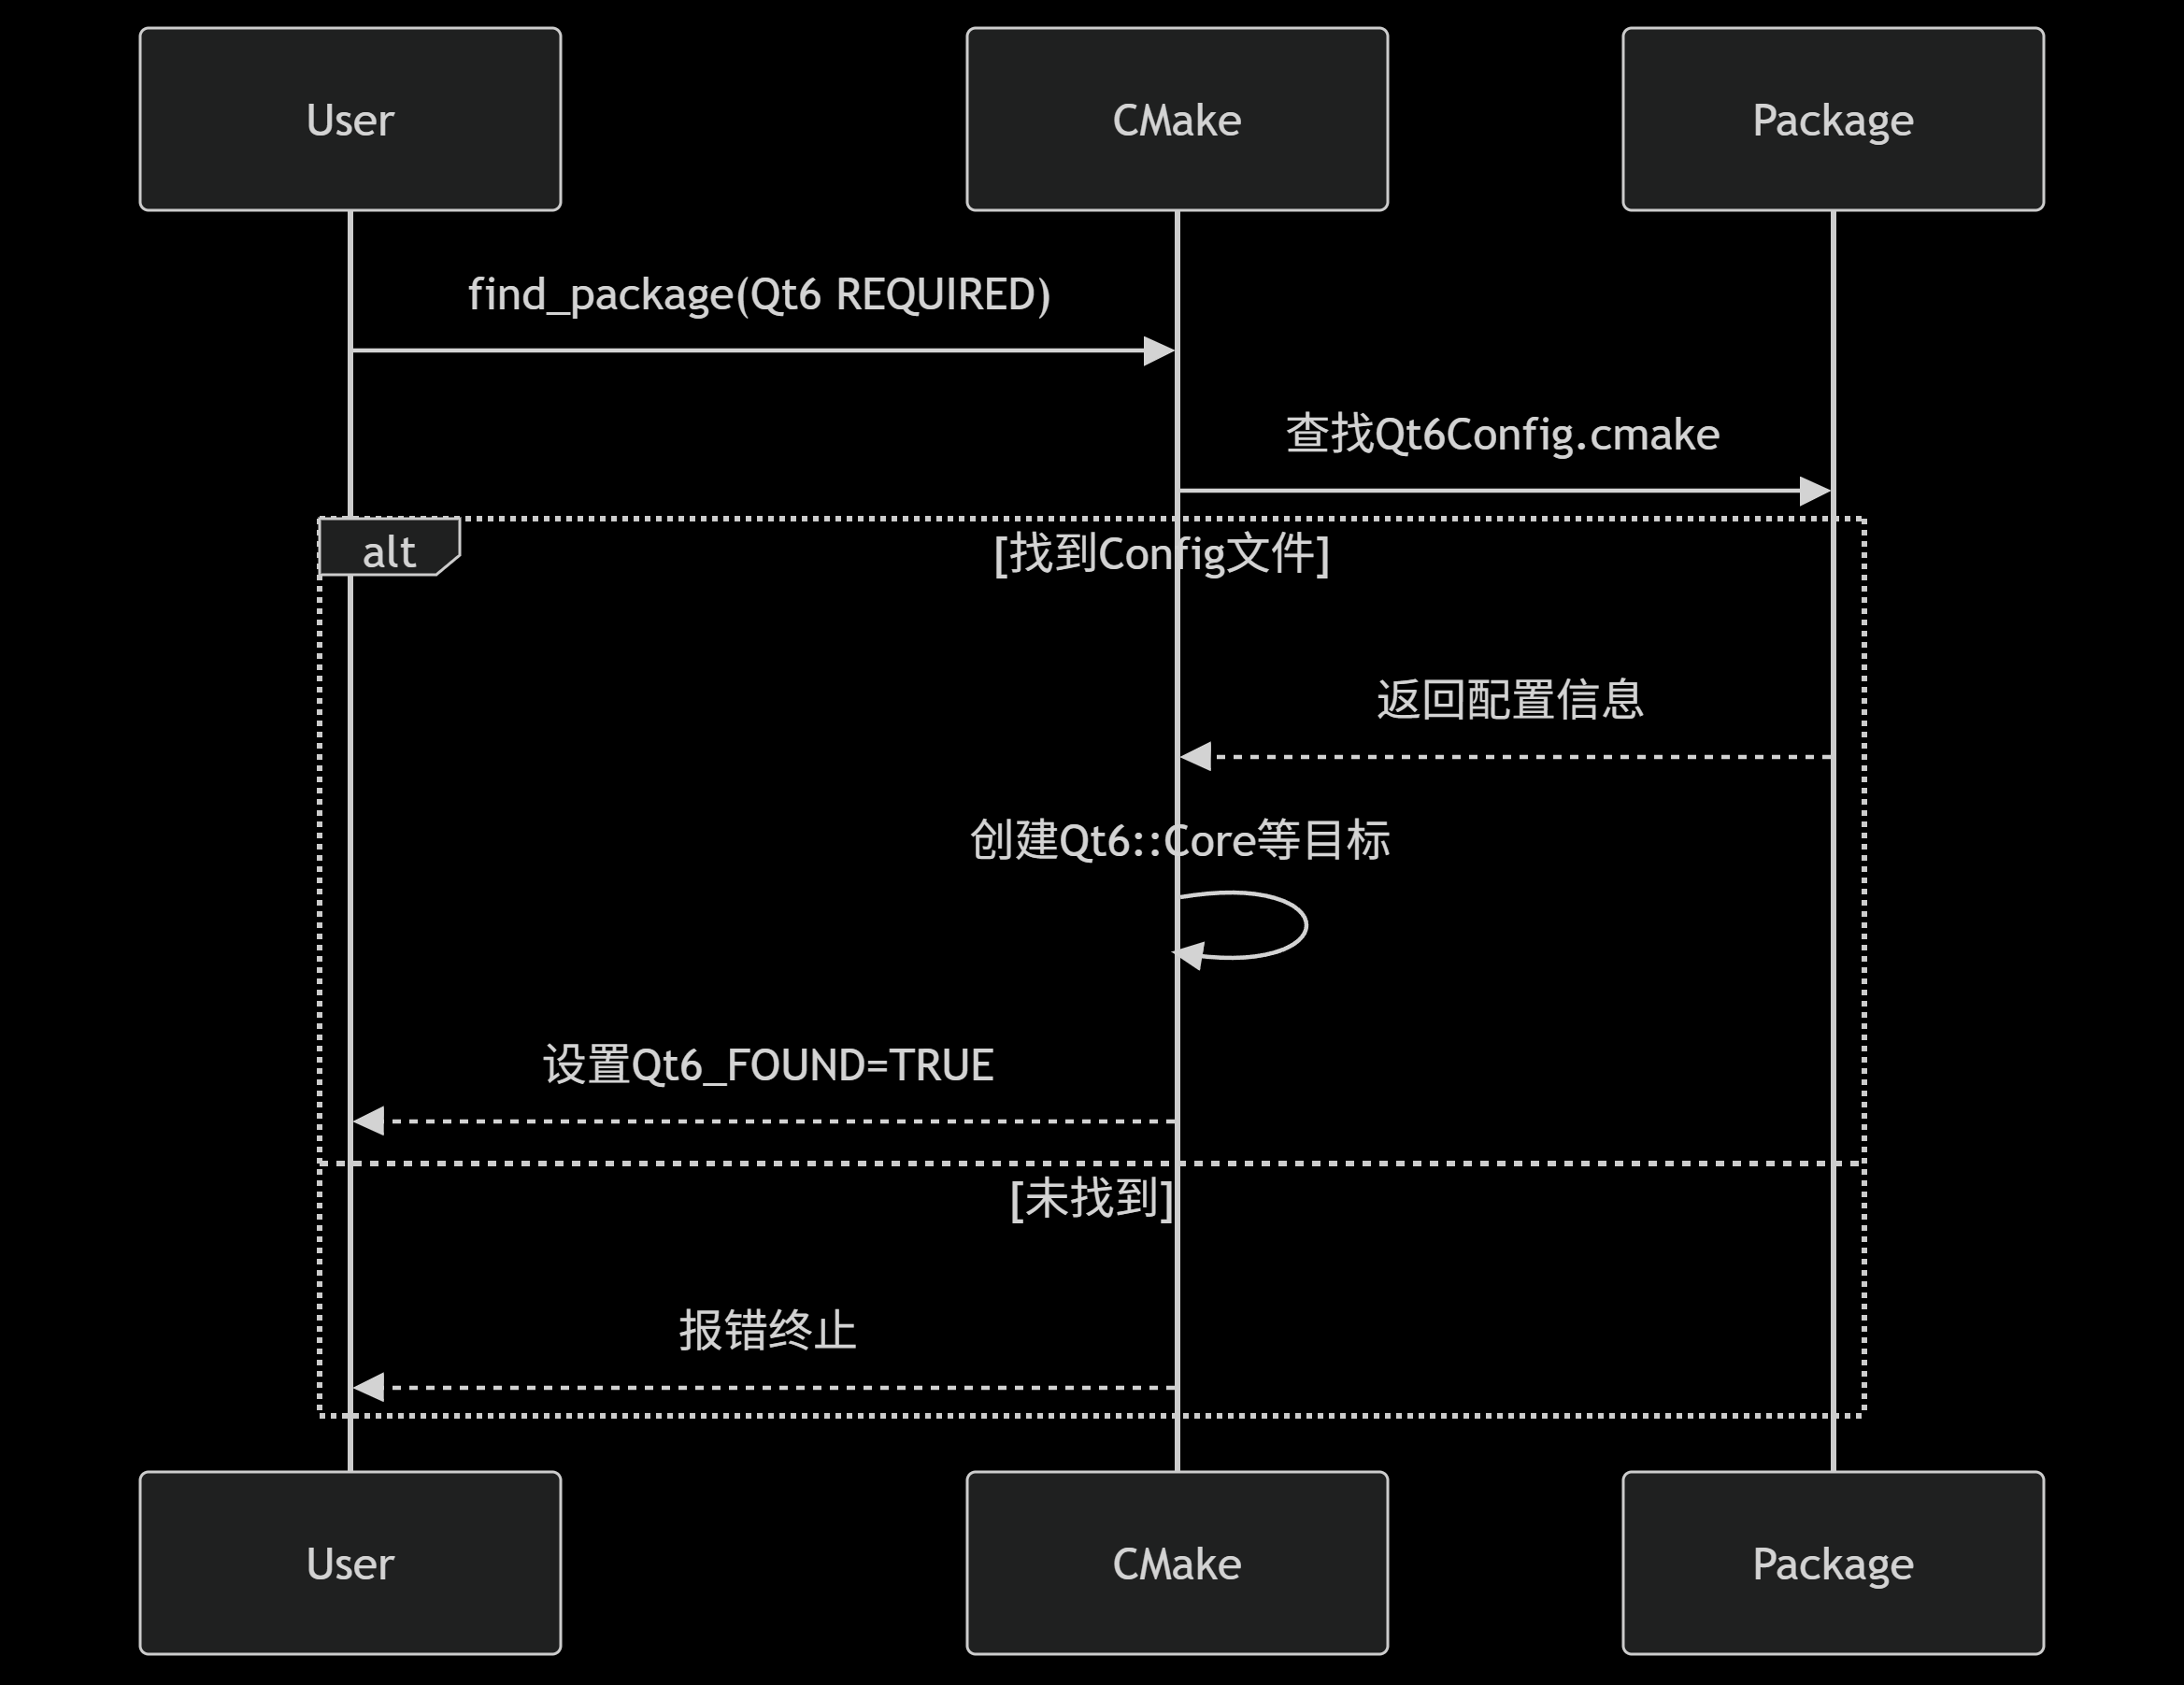
Qt 6 package-discovery sequenceQt 6 包发现时序图
The generated Qt 6 package-discovery sequence follows CMake to Qt6Config.cmake and imported targets such as the Qt 6 Core target, or to an error when the config is absent.生成式 Qt 6 包发现时序图跟随 CMake 查找 Qt6Config.cmake、创建 Qt 6 Core 等导入目标,未找到配置时则报错终止。
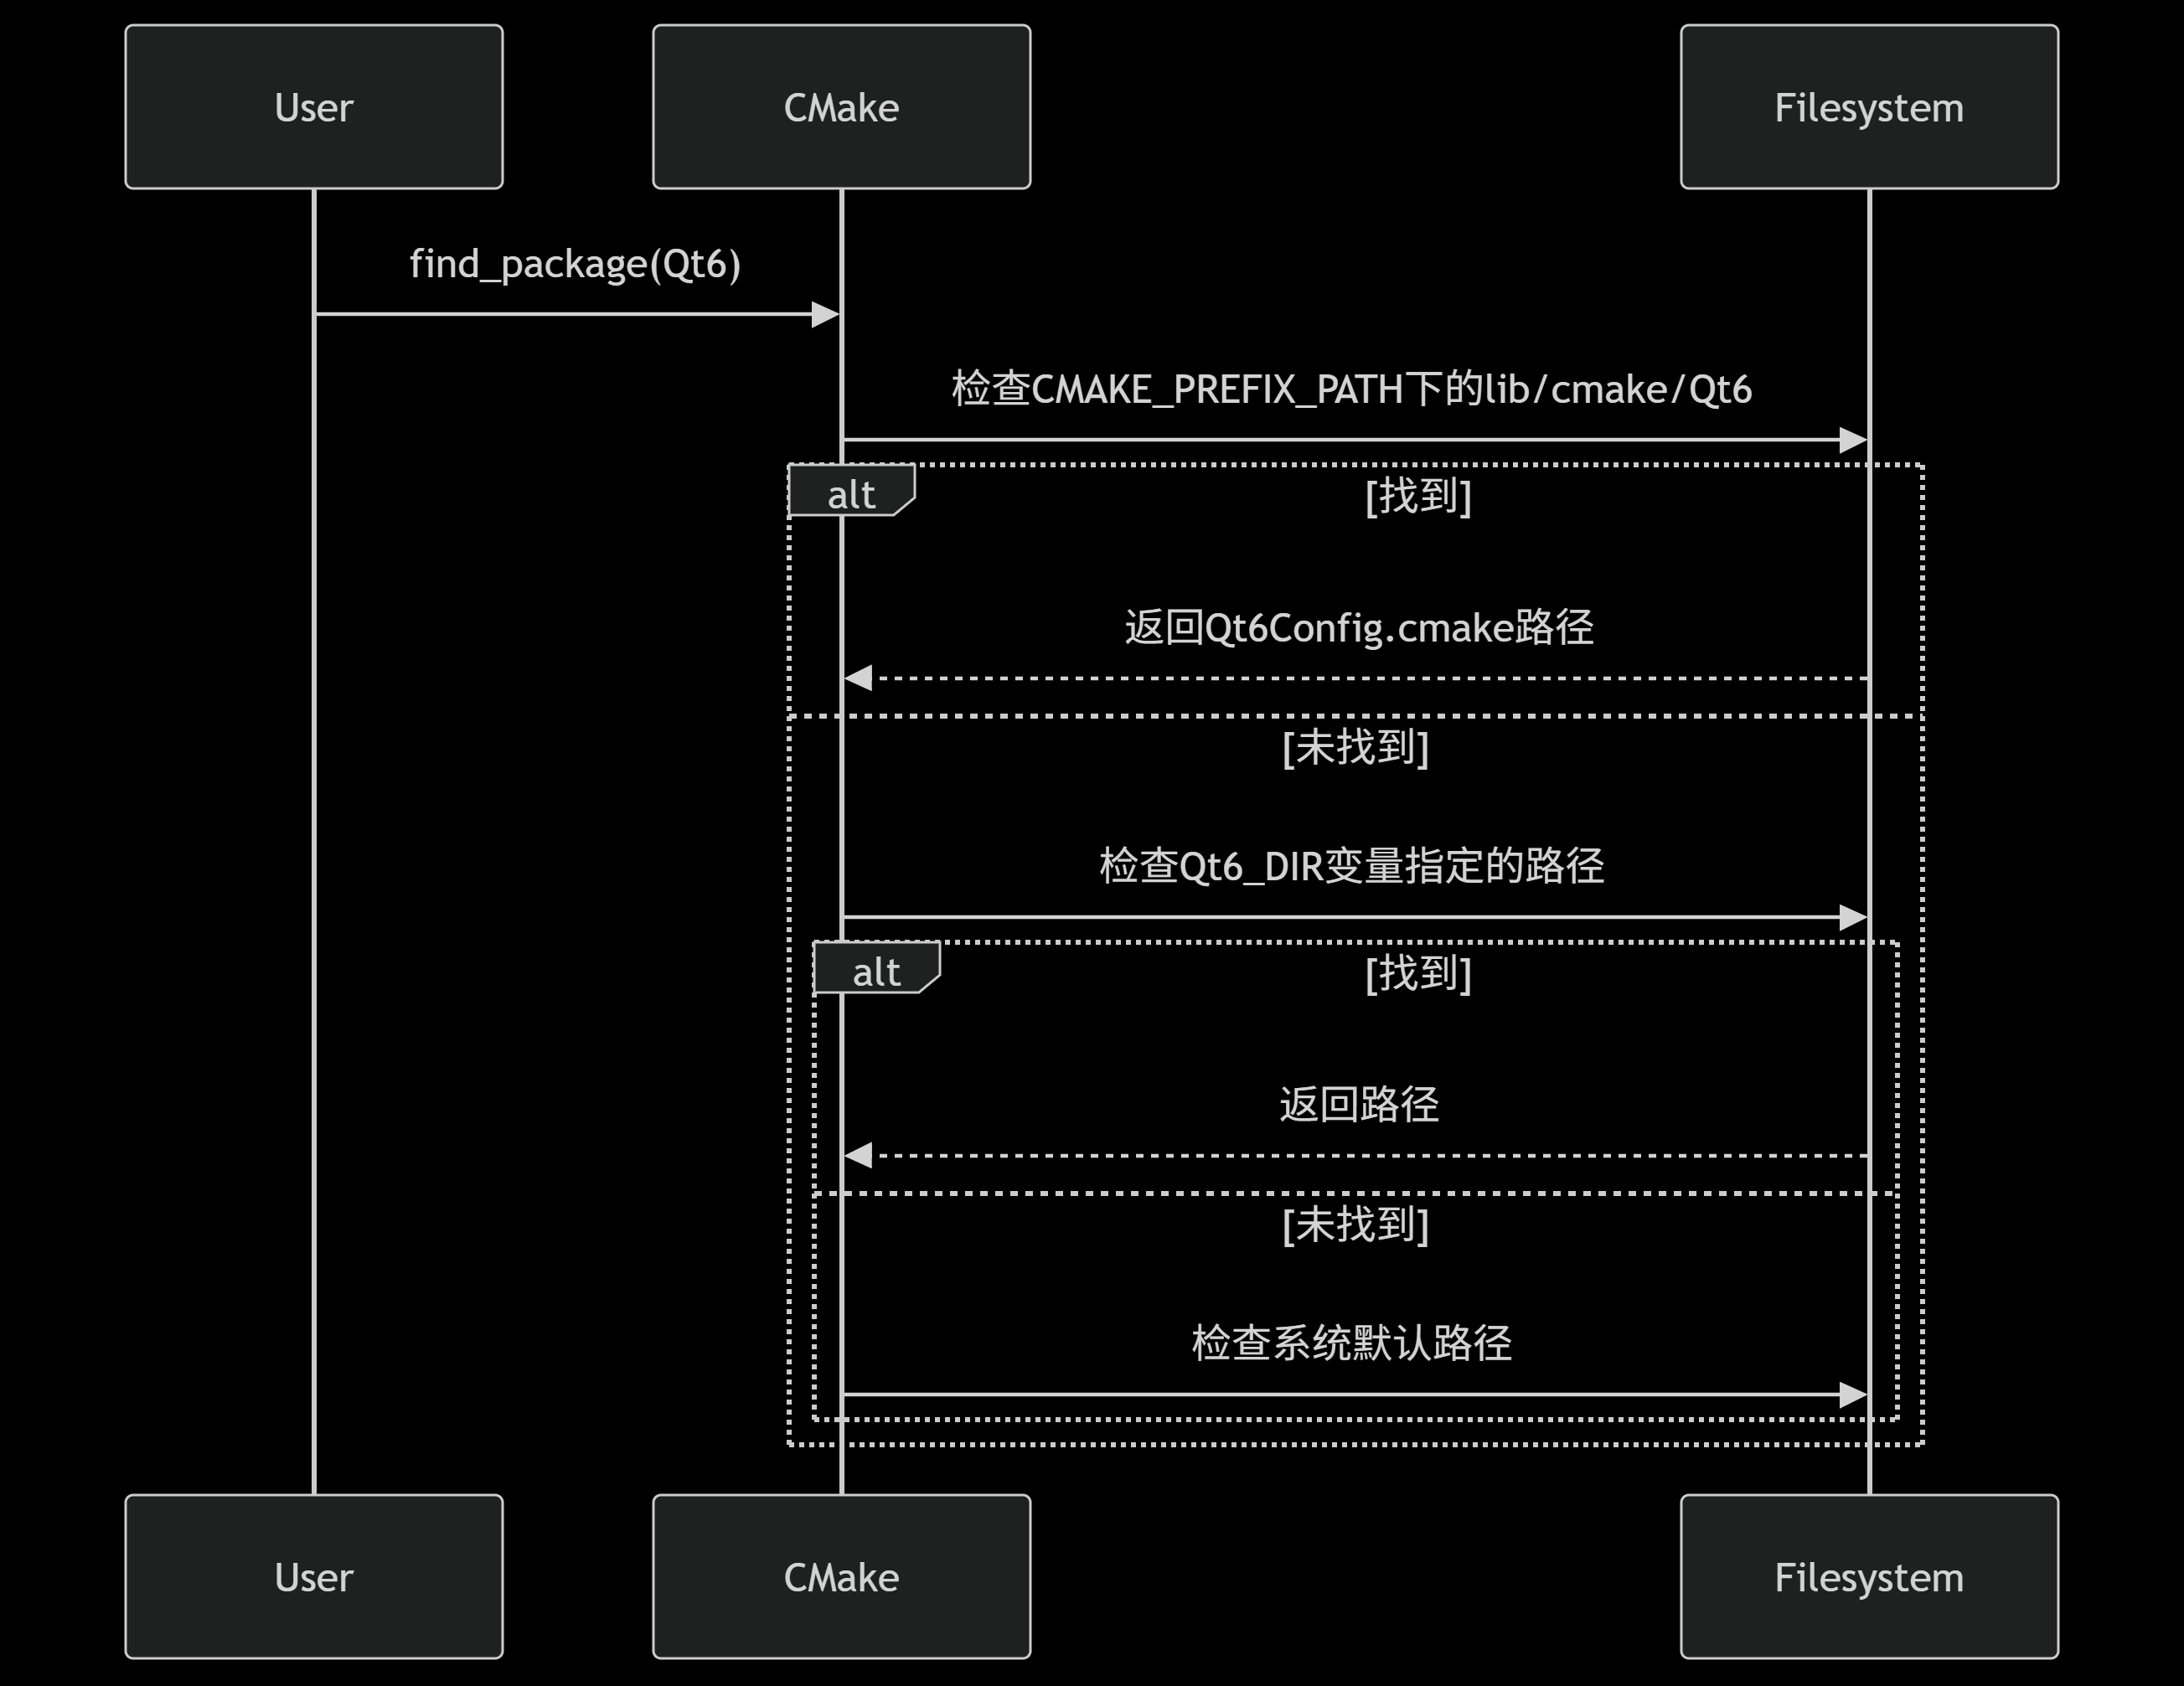
Qt 6 package search orderQt 6 包搜索顺序
Another generated diagram in the Notion note compares CMAKE_PREFIX_PATH, Qt6_DIR, and default system paths during Qt package discovery.Notion 笔记中的另一张生成图比较了 Qt 包发现时的 CMAKE_PREFIX_PATH、Qt6_DIR 与系统默认路径。
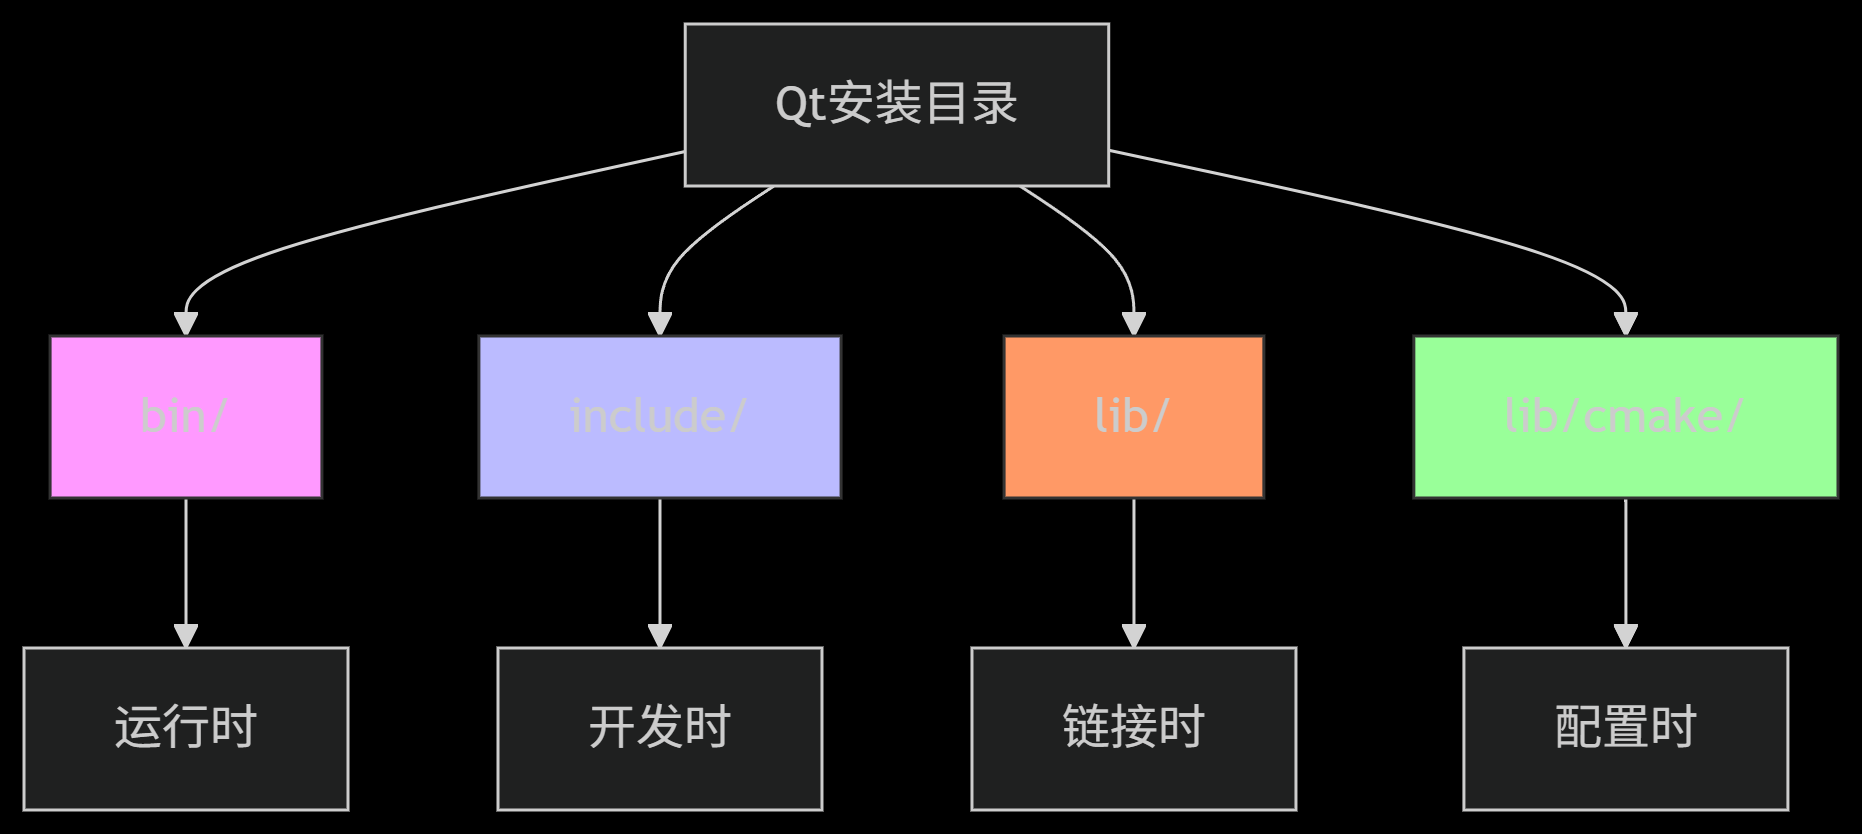
Qt installation directory rolesQt 安装目录分工图
The generated directory map labels bin for runtime tools, include for development headers, lib for link-time files, and lib/cmake for package configuration.生成式目录图把 bin 标为运行时工具区、include 标为开发头文件区、lib 标为链接文件区,lib/cmake 则放包配置。
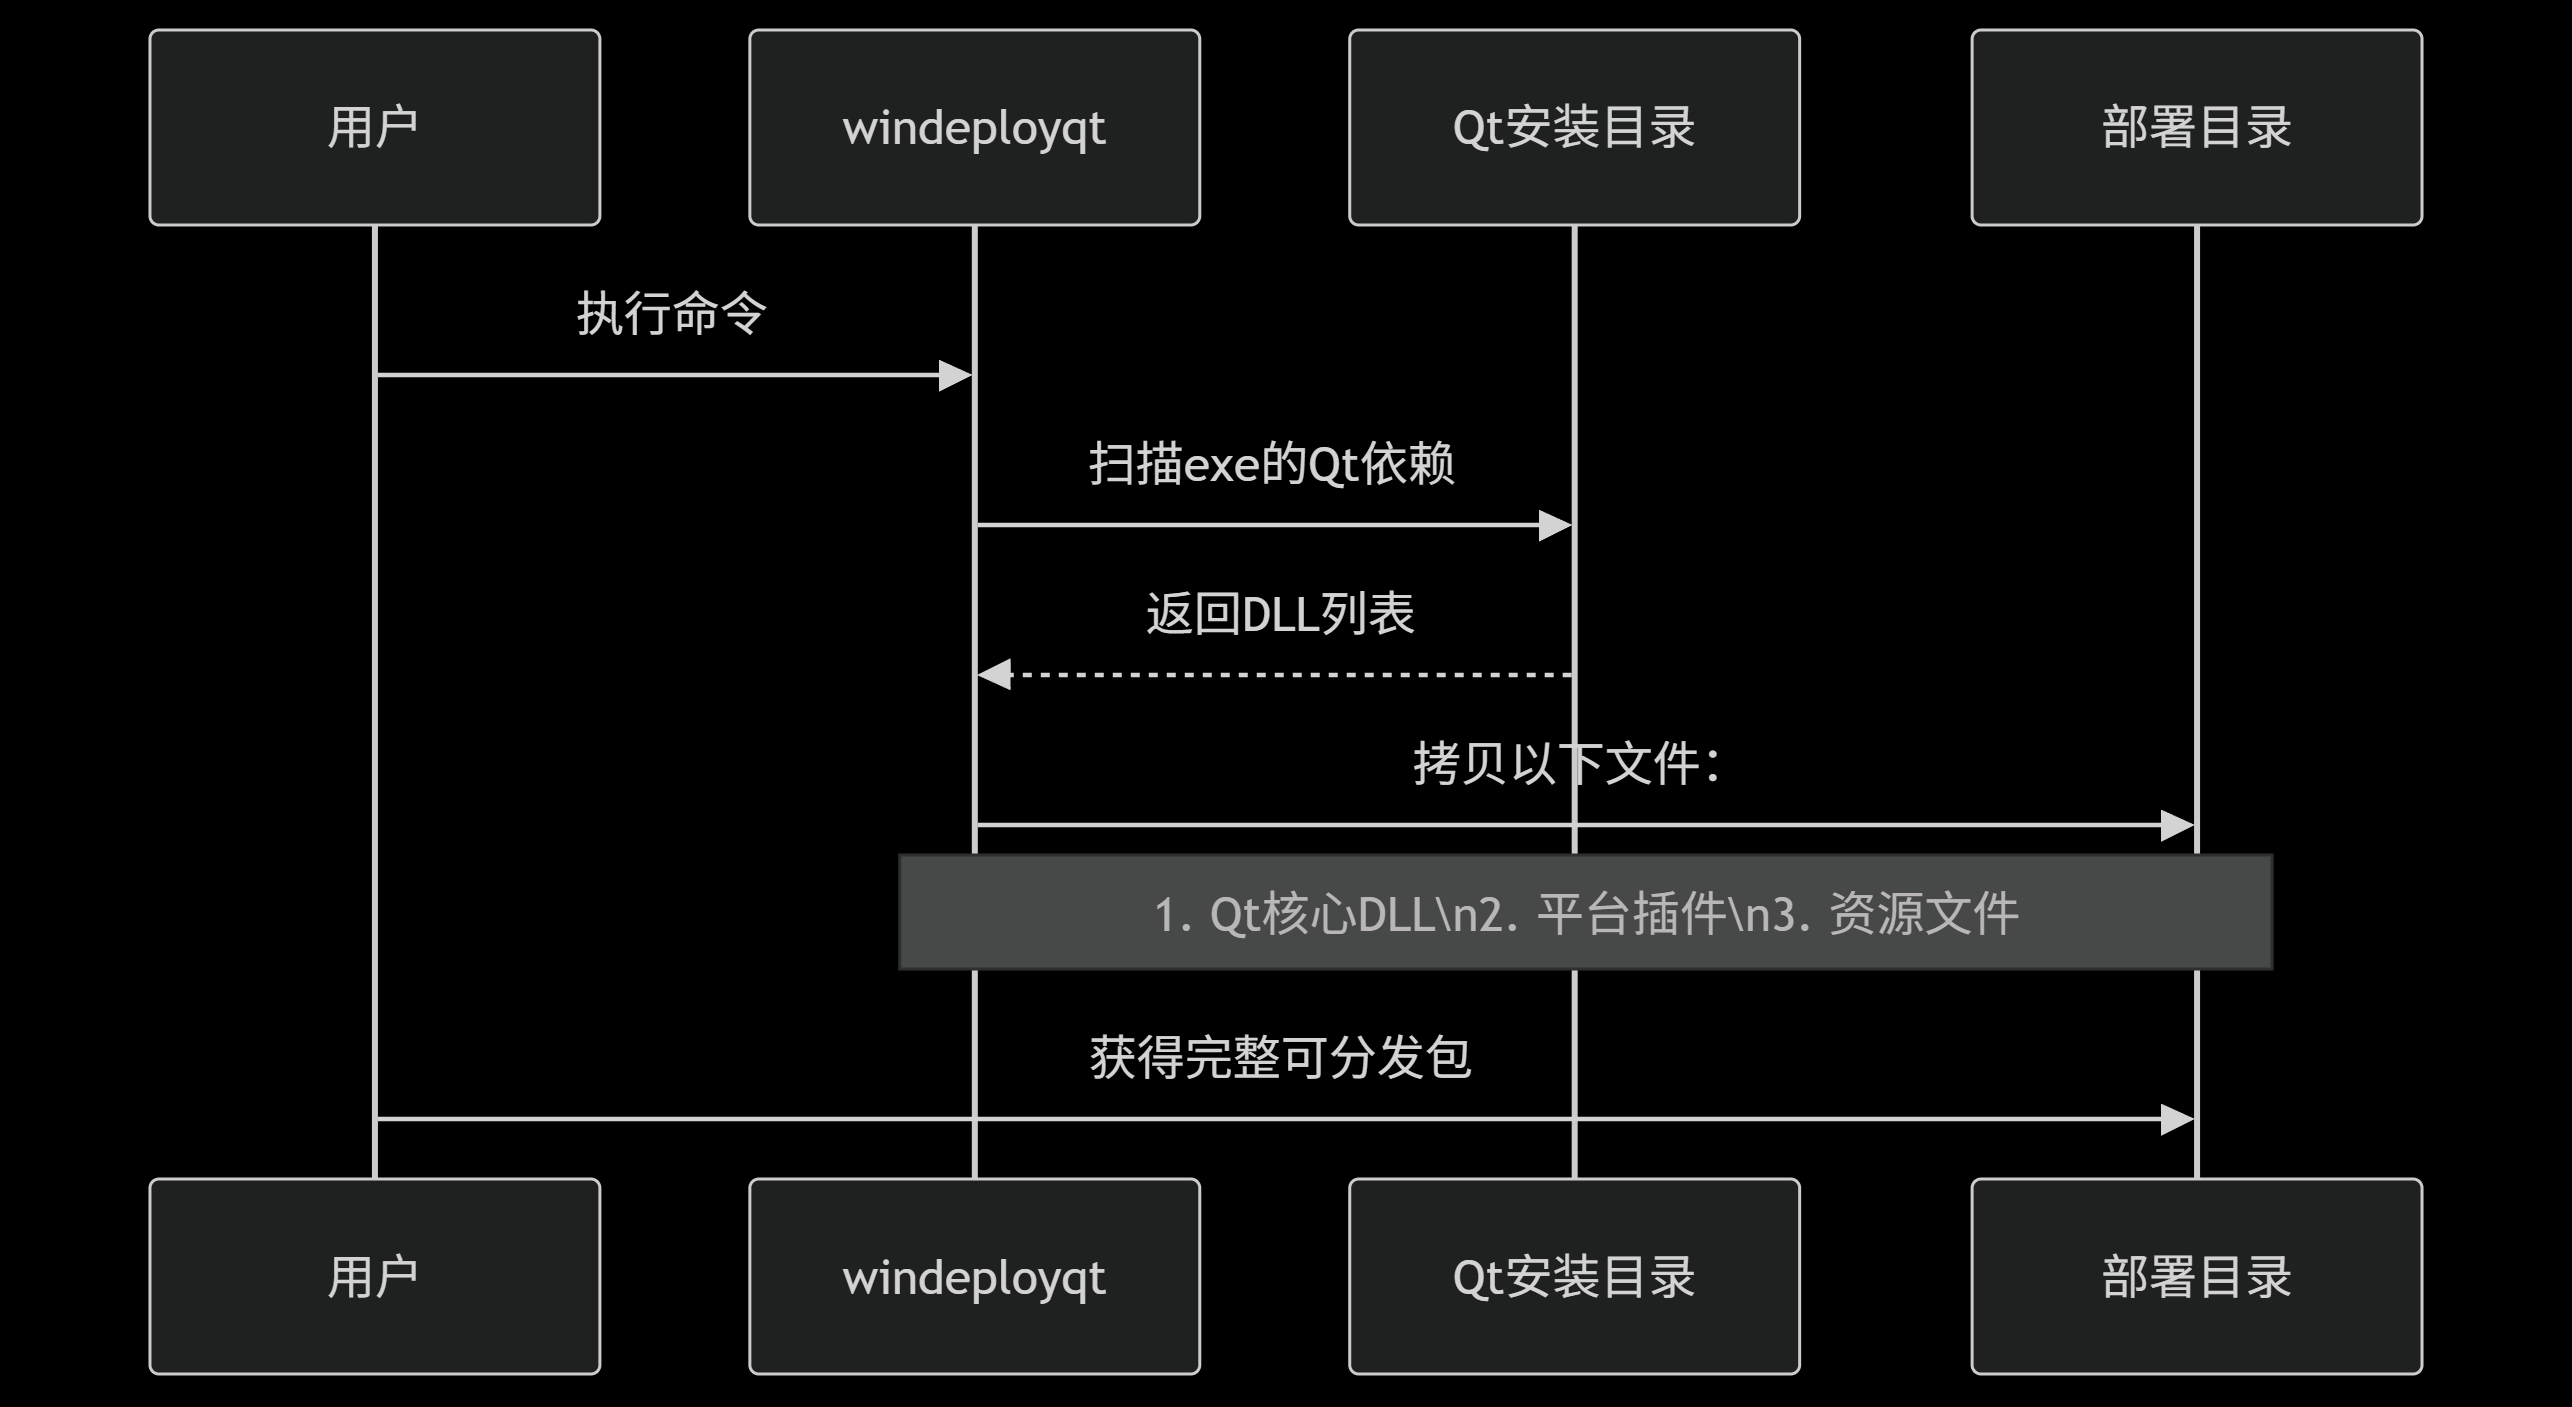
windeployqt dependency-collection sequencewindeployqt 依赖收集时序图
A generated sequence diagram shows windeployqt scanning an executable's Qt dependencies and copying core DLLs, platform plugins, and resources into a deployment directory.生成式时序图展示 windeployqt 扫描可执行程序的 Qt 依赖,并把核心 DLL、平台插件与资源复制到部署目录。
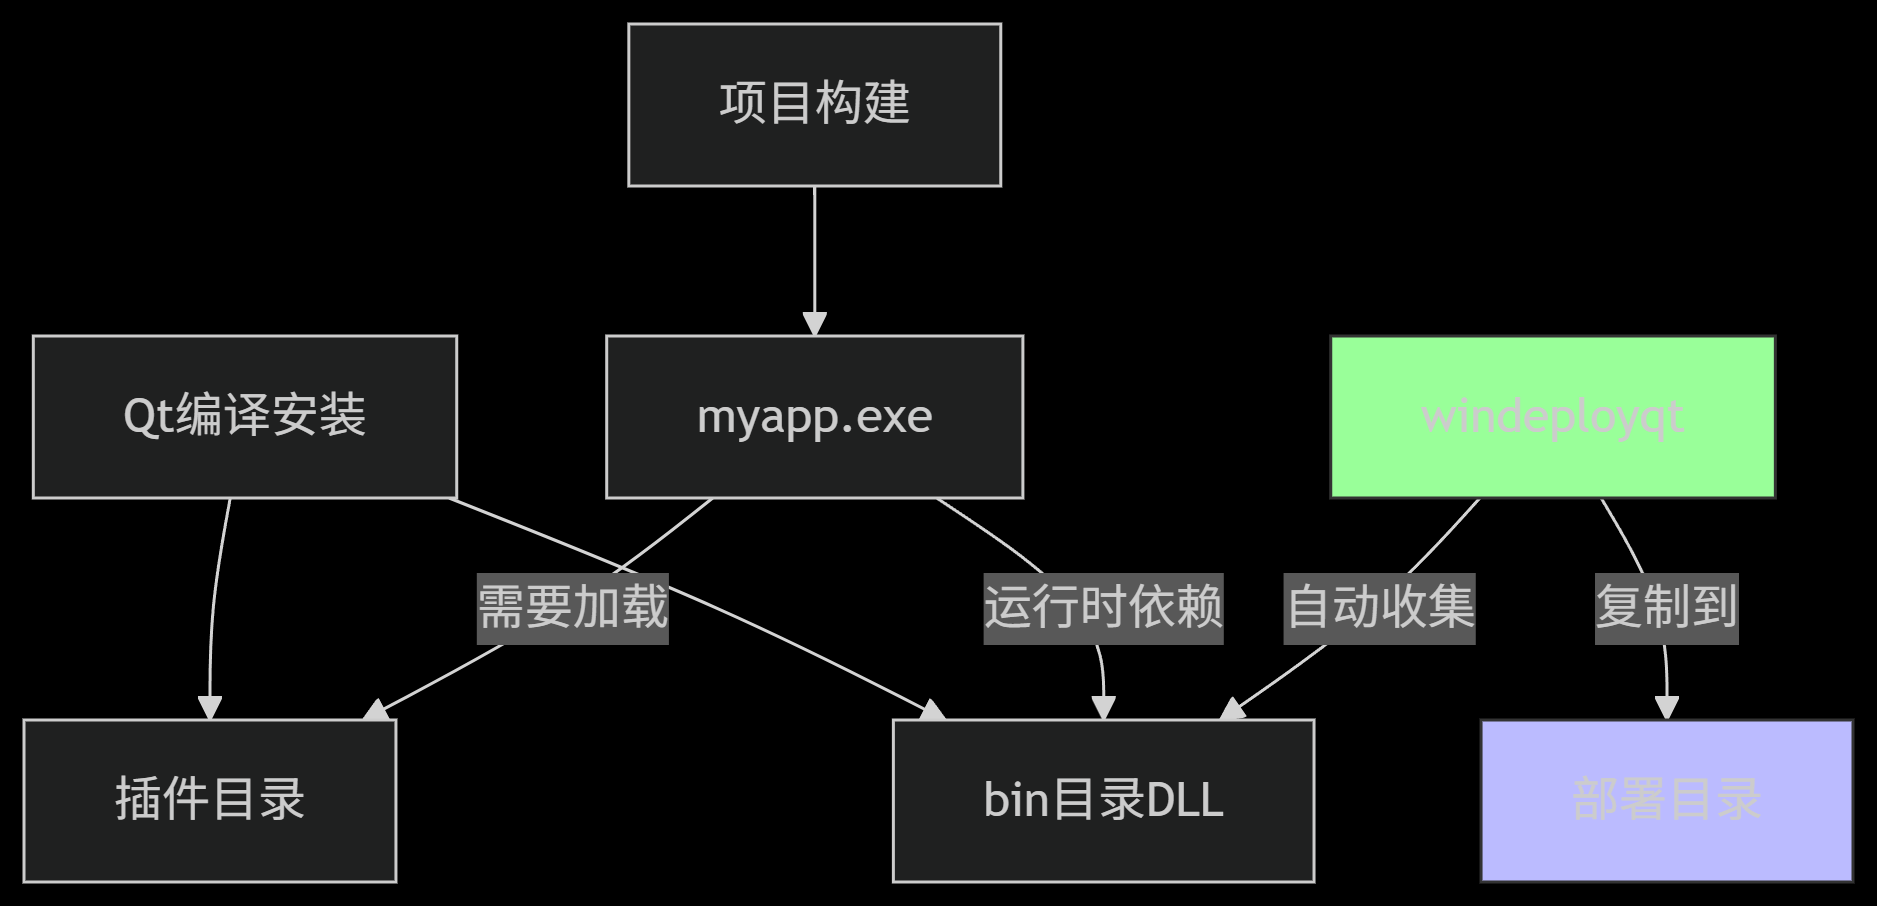
Qt runtime dependency mapQt 运行时依赖关系图
This DeepSeek-generated map connects the built executable, Qt DLL/plugin locations, and windeployqt's collection step; non-Qt libraries still need separate handling.DeepSeek 生成图串起已构建程序、Qt DLL/插件位置与 windeployqt 收集步骤;非 Qt 库仍需另行处理。
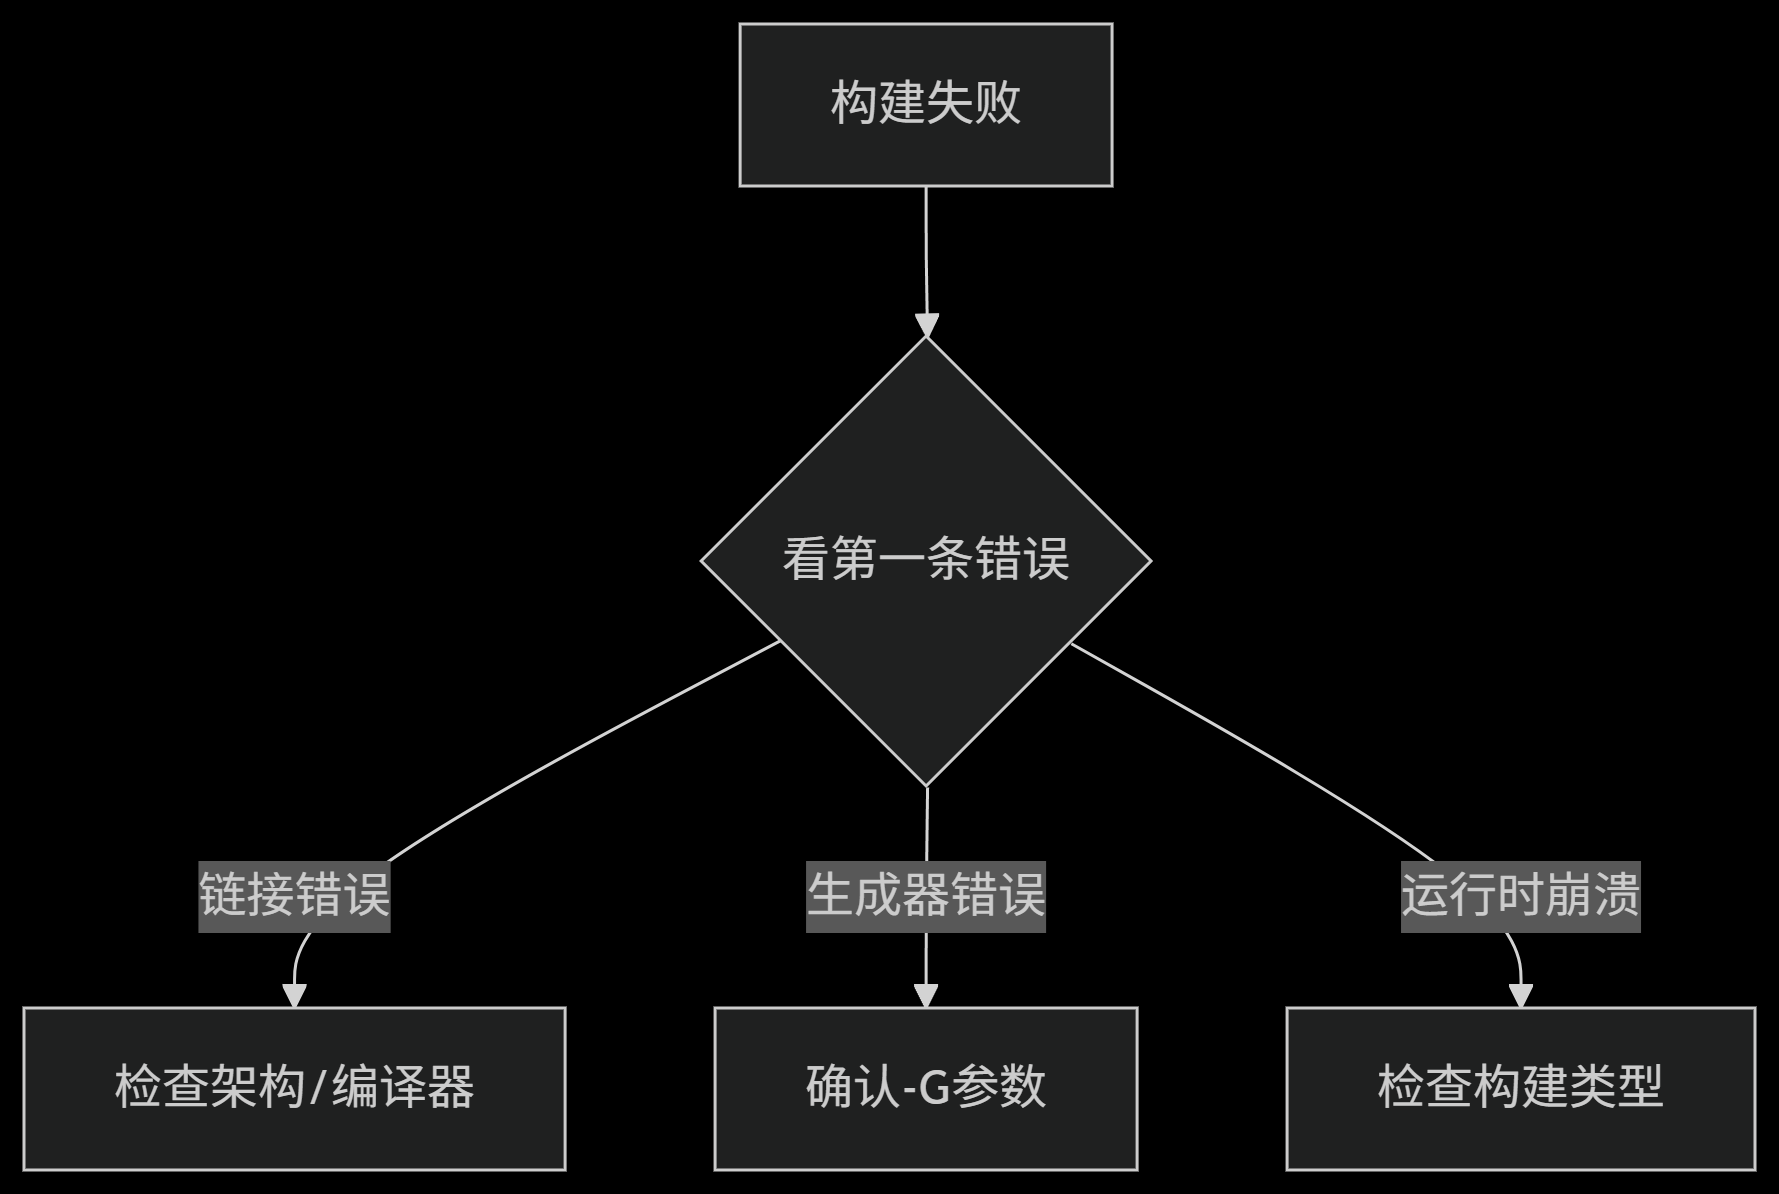
Build-failure first-check map构建失败的第一轮检查图
The final generated troubleshooting chart begins with the first error, then branches toward architecture/compiler, generator arguments, or build type according to the symptom.最后一张生成式排错图从第一条错误开始,再按现象分到架构/编译器、生成器参数或构建类型检查。