
2026.09.06
Latching Switches and Counter Control自锁按键与计数控制
Studying latching contacts, input bias, debouncing, state changes, and elapsed-time counting to define predictable pause and reset behaviour.从自锁触点和输入上下拉,研究消抖、状态变化与计数时序,理清暂停和复位怎样按预期响应。
Pause and reset each need only one switch, yet they call for quite different handling in the program. Pausing keeps the counter in a state; resetting can be defined as clearing the number when a particular action occurs. Revisiting this two-digit counter, I want to understand how a switch's mechanical position relates to a pin voltage and, eventually, to a single program action.
暂停和复位都只需要一只开关,接进程序以后,处理方法却很不一样。暂停时,计数器要保持一种状态;复位则可以约定在某次操作发生时把数字清零。我现在回看这套两位计数器,想先弄明白,开关的机械位置、引脚上的电平,以及程序执行的一次动作,究竟怎样对应。
Switch Contacts开关触点
The course uses six-pin latching pushbuttons. Latching describes the mechanical action: one push leaves the switch in a position, and another changes it back. The connections among the six pins depend on the contact arrangement inside. Taking a finger off the button does not necessarily return the contacts to their original position. Pause makes this distinction easy to see. The user can let go while the counter stays paused.
课程使用六脚自锁按键。自锁描述的是机械动作,按下一次后保持在一个位置,再按一次切换回来;六只脚怎样连通,则要看内部触点结构。手指松开按钮,并不等于触点已经回到最初的位置。这个区别放到暂停功能里尤其直观,按钮已经松手,计数器仍然可以保持暂停。
To understand the contacts, I would first disconnect the switch from the surrounding circuit, number its pins from a fixed viewing direction, and record continuity in both stable positions. If one pin connects to a neighbour on one side in the first position and to another on the opposite side after switching, that measurement identifies a changeover contact group. A second group needs its own check. Recording the viewing direction with the numbers lets me translate the drawing back to the physical part. I would rather establish those connections before choosing which wire goes to the input and which goes to ground.
要读懂触点,我会先让开关与外部电路断开,给六只脚按固定视角编号,再用通断档分别记录两个稳定位置下的导通关系。如果某只脚在一个位置与左侧脚连通,切换后改为与右侧脚连通,就可以按这个测量结果找出一组转换触点;另一组也单独确认。编号和观察方向一起记下来,才能把画出的关系准确接回实物。我更愿意先画清这些线,再决定哪根接输入、哪根接地。
The Default Input Level默认输入电平
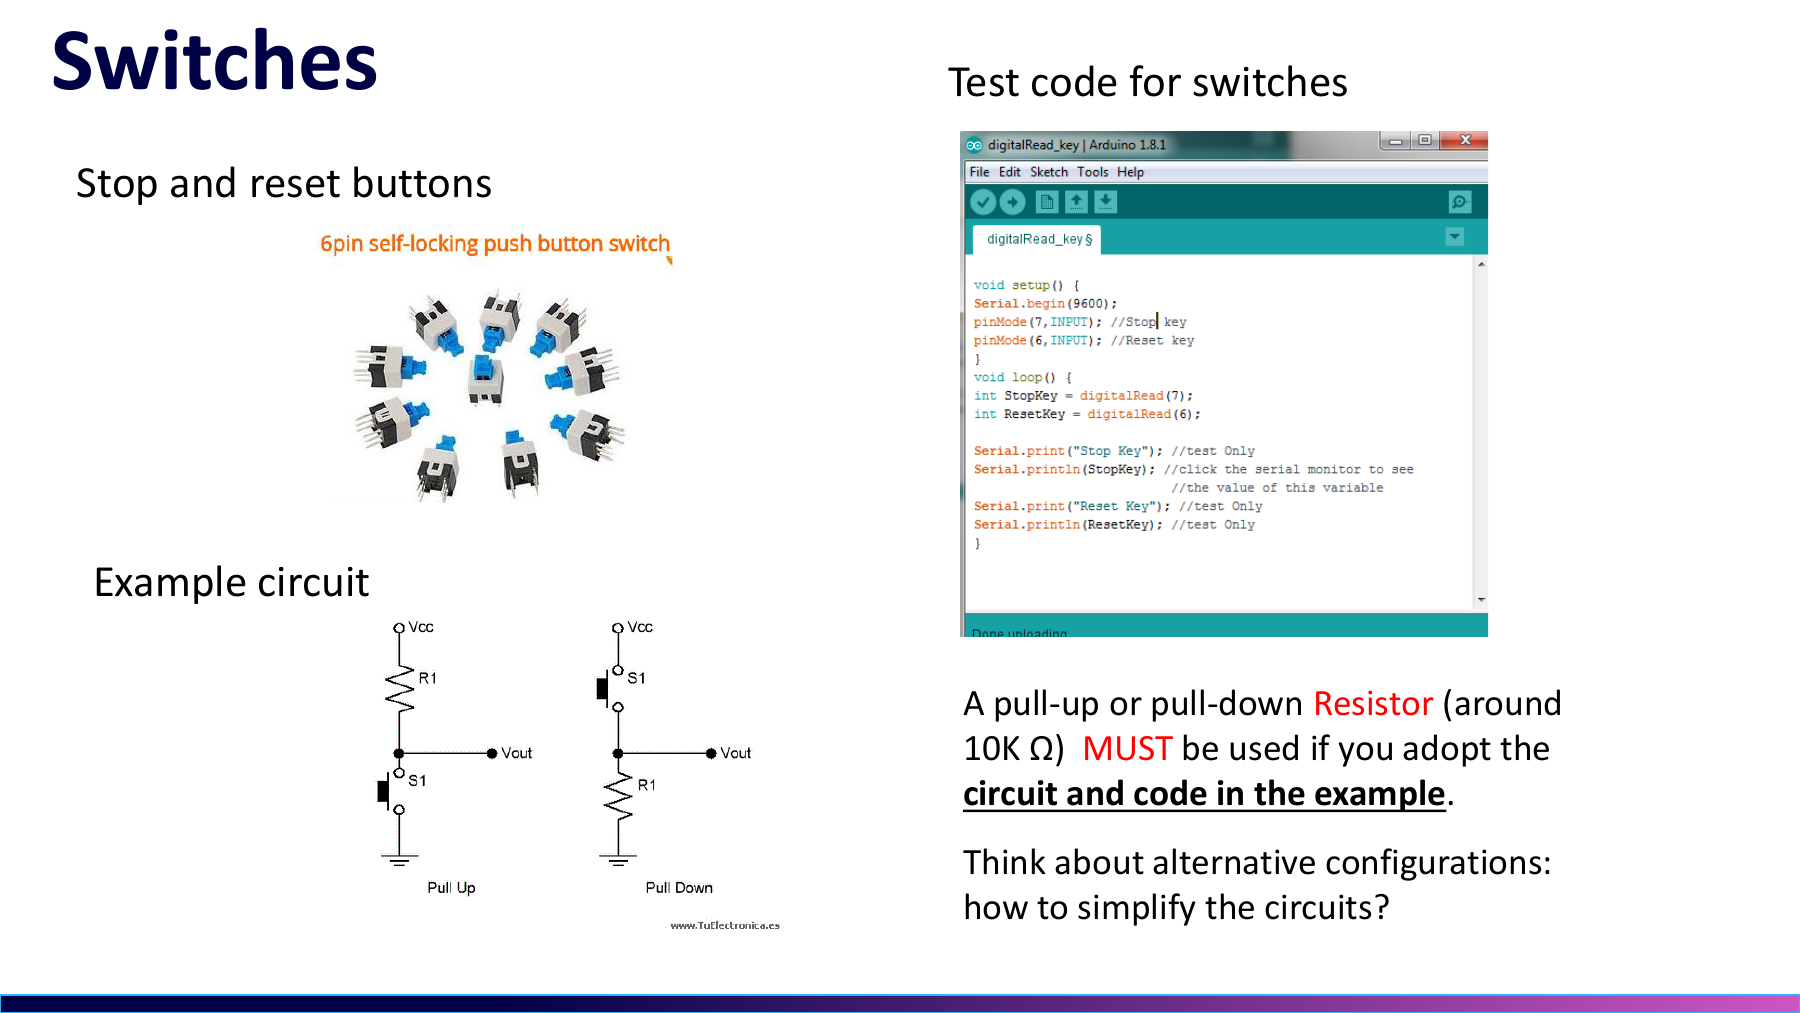
After identifying the contacts, the circuit still needs to give an open contact a definite input level. In the course slide's pull-up example, a resistor connects the input node to VCC, and the switch connects that node to ground. Opening the contact lets the resistor pull the input high; closing it grounds the input, producing a low reading. Choosing a different contact pair can change how mechanical position maps to voltage. I need to interpret HIGH and LOW from the actual wiring.
开关触点确认以后,接法还要给断开状态安排一个确定的电平。以课件里的上拉电路为例,电阻从输入节点接到 VCC,开关从节点接到地。触点断开时,电阻把输入拉高;闭合时,输入被接地,读成低电平。若选用另一组触点,机械位置与高低电平的对应也可能改变。程序里的 HIGH 或 LOW,需要按实际连线解释。
The resistor has another role that is easy to miss. With the contact closed, current flows from the supply through the resistor and switch to ground. A 5 V supply and 10 kΩ resistor give about 0.5 mA. Replacing the resistor with a wire would directly short the supply when the switch closes. Looking at both positions explains its job more fully: establishing the level while open and limiting current while closed.
这只电阻还有一个容易被略过的作用。闭合时,电源到地之间经过的是电阻和开关,电流受到限制。用 5 V 和 10 kΩ 作例子,电流约为 0.5 mA。若把电阻换成导线,这个连接就会在闭合时直接短接电源。断开时确定电平,闭合时限制电流,两种状态放在一起看,上拉电阻的作用才完整。
The course test sketch uses INPUT and repeatedly prints the readings. Arduino's `pinMode()` reference distinguishes that mode from INPUT_PULLUP, which enables the internal pull-up. Following this sketch therefore also means providing the external pull-up or pull-down shown in the circuit. Configuring an input alone does not supply the missing default level.
课程测试代码把输入设为 INPUT,然后不断打印读数。Arduino 的 `pinMode()` 说明区分了 INPUT 和 INPUT_PULLUP,后者才会启用内部上拉。所以照着这段程序接线时,课件中的外部上拉或下拉也要接上。仅把引脚设为输入,并不会自动替电路补好默认电平。
Switch Debouncing and State-Change Detection按键消抖与状态变化检测
Debouncing comes next. Mechanical contacts can briefly make and break several times during a transition, producing multiple changes from one operation. Arduino's Debounce example restarts a timer whenever the raw reading changes and accepts a new button state only after the reading has remained steady for an interval. That gives me two distinct values to follow. The raw input can change first; the state accepted by the program changes later.
接下来才轮到消抖。机械触点切换时可能短暂反复接触和分离,一次操作会在输入上形成几次跳变。Arduino 的 Debounce 示例每次发现原始读数改变,就重新记录时间,等它连续稳定一段时间后,才接受为新的按键状态。它给我一个很清楚的区分,原始读数可以先变化,程序认定的稳定状态稍后再变化。
Consider 20 ms as a stability interval for a worked example. The input goes low at 0 ms, returns high at 4 ms, and goes low again at 7 ms, staying there afterwards. Timing begins again at the final transition, so low is accepted at about 27 ms. The 20 ms value makes the sequence easy to follow; an actual interval needs to suit the switch and response requirements. Waiting for stability adds latency, and a longer interval delays acceptance of the action.
例如,用 20 ms 作为推演中的稳定时间。读数在 0 ms 时变低,4 ms 时又变高,7 ms 时再变低,此后保持不变。计时应从最后一次变化的 7 ms 开始,到约 27 ms 才接受低电平。这里选 20 ms 是为了看清过程,实际时长要结合开关和响应要求确定。等待稳定会增加响应延迟,设得越长,动作被确认得也越晚。
Even after debouncing, the loop will read the same stable state repeatedly. Incrementing or toggling something every time it reads low can still produce many actions from a switch left latched in position. A single action needs a comparison between the old and new stable states, triggering only on the chosen transition. Arduino's state-change example compares the current value with the previous one. I can now separate the two jobs: debouncing establishes the state, while change detection identifies the moment chosen to trigger an action.
消抖之后,循环仍然会一遍遍读到同一个稳定状态。若每次读到低电平就执行一次计数或切换,一只锁住的按键照样能触发很多次。要把一次操作变成一次动作,还需要比较新旧稳定状态,只在选定的变化方向上触发。Arduino 的状态变化示例正是把当前值与上次值比较。到这里,消抖负责确认状态,变化检测负责挑出动作发生的那一刻,两者的作用就分开了。
For this counter, I would define the two controls explicitly. Pause follows the debounced switch state, stopping increments while latched in the pause position and continuing when switched back. Reset uses a selected transition, such as entering the active position, to clear the number once. Staying there does not repeatedly clear it. At startup, the program should also read and establish the initial state, so a switch already pressed is not mistaken for a new operation. Other interactions can use different rules; the code and the way the controls are used need to agree.
对这份计数器,我会先给两个功能写下明确约定。暂停跟随消抖后的开关状态,锁在暂停位置就持续停止加数,切回来再继续。复位则选择一个确定的状态变化,例如进入有效位置时清零一次,保持在这个位置不再反复清零。启动程序时,也要先读取并确认初始状态,避免把开机时已经按下的开关误当成刚发生的一次操作。不同交互要求可以采用不同约定,但代码和实际使用方式要一致。
Loop Timing and Button Response主循环计时与按键响应
The counter's delay(1000) introduces another timing question. While the main loop waits for a second, the button polling that follows has to wait too. A brief press and return can fit entirely between two reads. A latching switch that remains in its new position will usually still be read on the next pass, although the response comes later. Arduino's `delay()` documentation also distinguishes suspension of the main program from mechanisms such as interrupts that can continue. What matters for these buttons is how often the loop returns to read them.
再看计数程序里的 delay(1000),前面的问题又多了一层时间关系。程序在主循环里等待一秒时,后面的按键轮询也得等它返回。一次很短的按下和恢复,可能完全落在两次读取之间;自锁开关若保持在新位置,下一次通常还能读到,不过响应会晚。Arduino 的 `delay()` 说明也区分了暂停主程序与中断等仍可继续工作的机制。这里影响按键的是主循环多久回来读一次。
A one-second interval between increments can be checked without stopping the loop from reading the switches. On each pass, read millis(), process the inputs and state changes, and update the count only when a second has elapsed since the last counting reference. Blink Without Delay demonstrates this elapsed-time approach. Display updates and other work also need to stay brief so that debouncing and change detection receive input samples frequently enough.
一秒可以作为两次加数之间的时间条件,等待期间让主循环继续检查开关。每轮读一次 millis(),处理输入和状态变化,再比较距上次计数是否已满一秒,到时才更新数字。Blink Without Delay 示例用的就是这种经过时间的判断。显示更新和其他处理也要尽量短,循环能及时回来,前面的消抖与变化检测才有足够频繁的输入。
Resuming from pause raises a small question worth answering before writing the code. If 700 ms of the second has elapsed when I pause, should resuming leave 300 ms or begin a fresh second? Both behaviours are possible, but they feel different to use. For a new version of this exercise, I would start a full second on resume and reset the timing reference when clearing the count. Preserving the elapsed 700 ms would instead require storing that partial interval. Defining the choice avoids an immediate extra increment caused by an old timing reference after resuming.
暂停恢复时还有一个值得提前想清楚的小问题。假设一秒已经走过 700 ms,此时暂停,恢复后是再等 300 ms,还是重新等一秒?这两种行为都能写出来,却对应不同的使用感受。给这个练习重新安排逻辑时,我会约定恢复后重新计满一秒,清零时也重置计时起点;若要保留已走过的 700 ms,就把这部分时间另存下来。这样可以避免恢复后因计时起点太旧而立刻多加一次。
I would also give reset priority when it arrives in the same loop iteration as an increment becoming due, skipping that increment. Otherwise the program can write 0 and then immediately change it to 1, making reset appear ineffective. This example makes me want to reason through input handling, state updates, and count updates together. Contact bounce and the order of program operations each deserve their own check when behaviour looks wrong.
我还会明确同一轮同时遇到复位和计数到期时的顺序,让复位优先,并跳过这一轮的加数。否则刚写入 0,后面又满足加数条件,显示马上变成 1,从外面看很像复位没生效。这个例子让我更愿意把输入处理、状态更新和计数更新的顺序放在一起推演。遇到异常时,触点抖动和程序执行顺序都值得分别检查。
Pause should hold the displayed number, reset should clear it, and either action should take effect promptly. Getting that behaviour depends on how the contacts are wired, how inputs are interpreted, and when the loop acts on them. A single movement of the switch feels simple in the hand. The program still has to deal carefully with the changes it produces.
暂停时保留原来的数字,复位时清零,拨动开关后及时响应,用这只计数器时期待的其实就是这些。让这些动作按预期发生,得把触点状态、输入判断和主循环顺序一起安排好。开关在手里只需要拨一下,程序却要认真处理这一下带来的变化。