

2026.09.07
PWM Fan Control and Speed FeedbackPWM 风扇控制与转速反馈
Studying fan power and PWM connections, waveform frequency and duty, and separate tachometer feedback for measuring each fan’s response.从风扇供电与 PWM 接线,研究频率、占空比和独立测速反馈,理解怎样观察每只风扇的实际响应。
The cooler's OLED labels a percentage as Fan Speed. Following the display function, I find that it reads dutyCycle, the PWM duty sent to the fan. That label gives me a useful question to pursue. How does a duty setting act on a fan, and where would I get a reading of how fast the fan actually turns?
这台散热器的 OLED 上有一项 Fan Speed,后面显示百分数。我顺着程序里的显示函数往下找,它取的是 dutyCycle,也就是发给风扇的 PWM 占空比。这个名字把我想研究的问题引了出来:一个占空比设置怎样作用于风扇,又要从哪里得到风扇实际转了多快的消息?
Fan Interface Wiring风扇接口的连线
On this version of the ESP32 controller schematic, D5 connects to the PWM net. The fan outputs use three signals, 12V+, 12V−, and PWM. The two four-pin connectors also carry only those three signals, leaving one pin unconnected on each. Following the nets tells me more directly where power and control go than counting the connector pins does.
在这版 ESP32 控制板原理图上,D5 接到 PWM 网络,风扇输出接口使用 12V+、12V− 和 PWM 三种信号。两个四针接口也只接了这三种信号,各留一针未连接。顺着连线看,比数接口有几只脚更直接,电源与控制各自走哪根线,一眼就能对上。
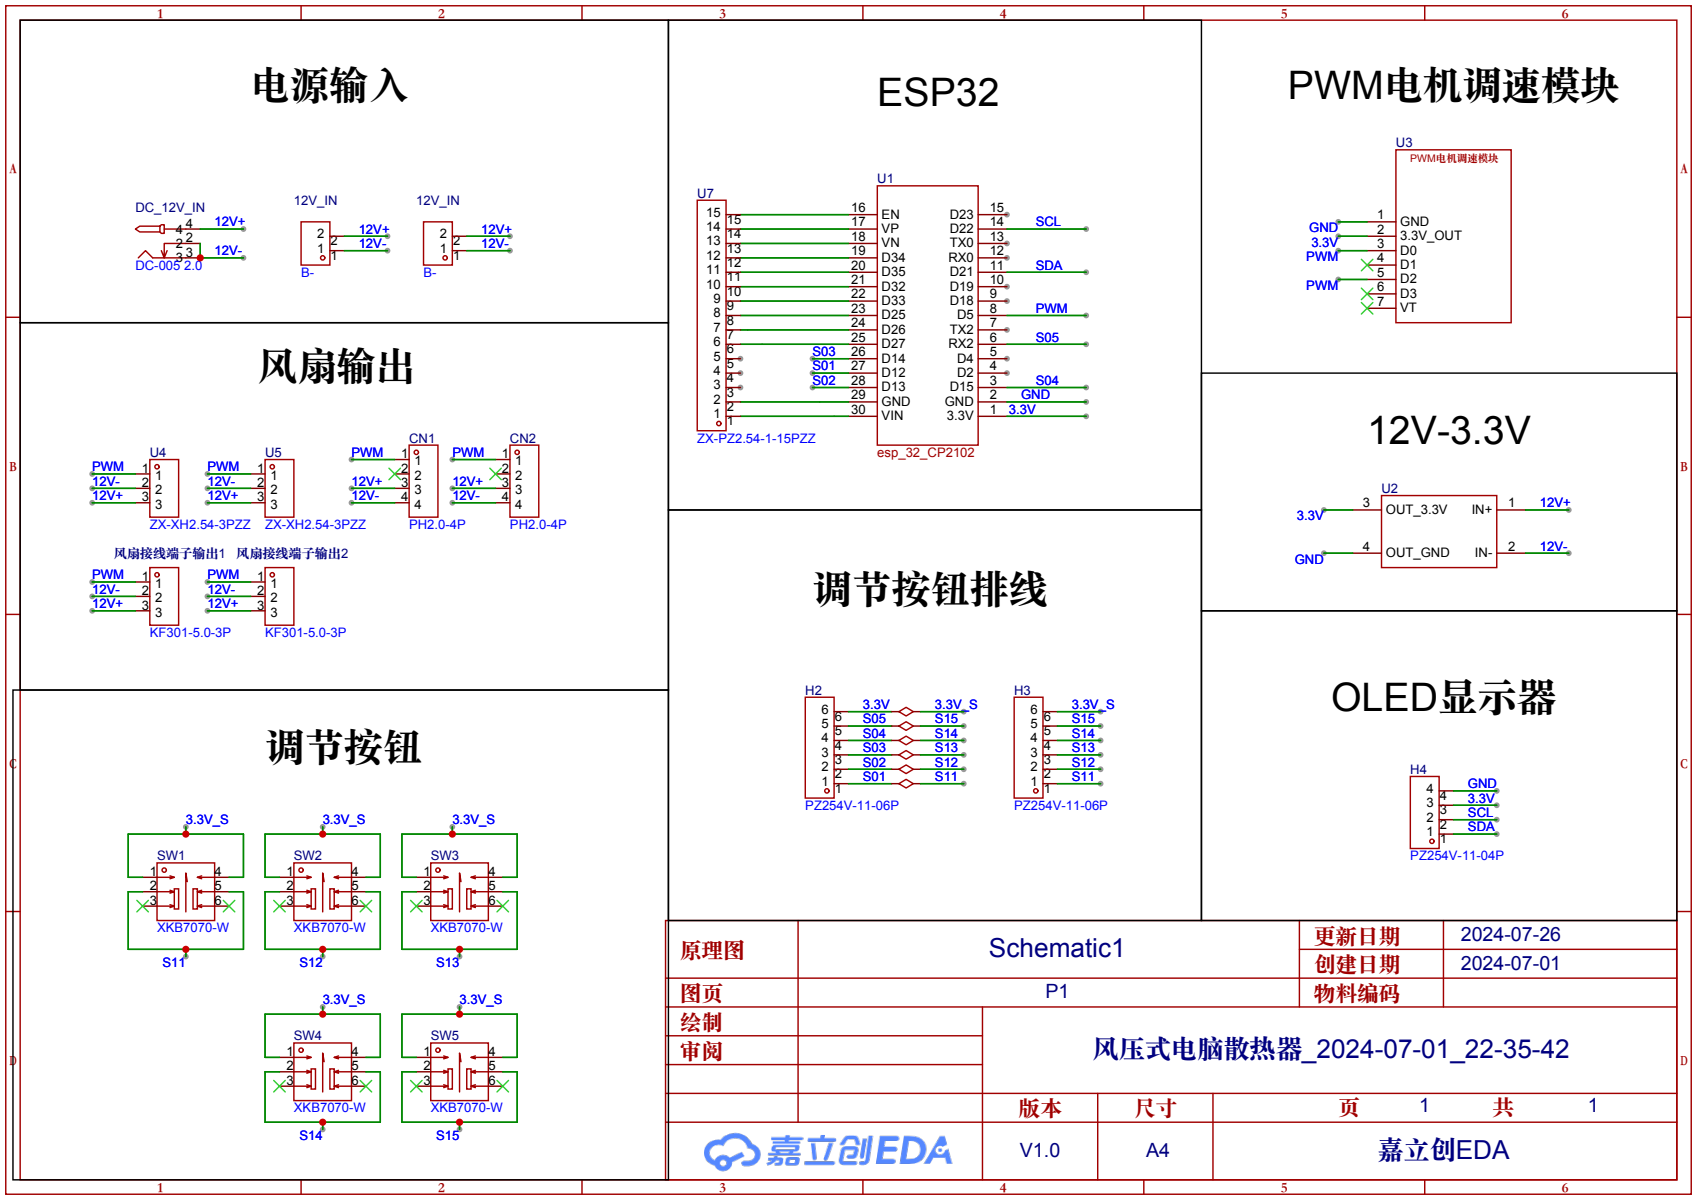
Studying four-wire PWM fans brought their internal drive electronics into the picture for me. The four connections provide power, ground, a PWM input, and a tachometer output. The supply wires deliver the motor's energy, the controller sends a command through the PWM input, and circuitry inside the fan drives the motor. Analog Devices' explanation of fan control also describes why a dedicated PWM input matters. It lets the fan electronics remain powered; repeatedly switching the entire fan supply can interrupt the tachometer output along with it.
查四线 PWM 风扇的原理时,我才把风扇内部的驱动电路也放进考虑。它有供电、地、PWM 输入和测速输出这四条连接。电机所需的能量由电源线提供,控制器从 PWM 输入给出指令,风扇内部电路负责驱动电机。Analog Devices 的风扇控制说明还讲到,把 PWM 放在专用控制线上,可以让风扇电子电路持续供电;若用开关反复切断整只风扇的电源,测速输出也可能随供电中断。
I can now consider the two wiring jobs separately. The 12 V supply provides energy for the motor, while the GPIO provides a logic signal. That signal needs a compatible voltage level and ground reference at the fan interface. The motor supply voltage does not define the PWM pin's logic level. I would map each connector pin against the schematic and the fan's pin definitions; a four-pin housing alone leaves those connections unspecified.
这也解释了我在接线时应该分别考虑的两件事。12 V 供电负责提供电机运行所需的能量,GPIO 提供的是逻辑信号。控制信号的电平和参考地要与风扇接口相容,不能按电机的供电电压去理解 PWM 引脚。具体接插件的脚序仍要按图纸和风扇定义逐根对应,四针的外形本身并没有把这些关系说明白。
Frequency, Duty, and Speed频率、占空比和转速
The program initially configures PWM at 15 kHz with 8-bit resolution. A cycle at that frequency lasts about 66.7 μs. An ideal 50% duty keeps the signal high for about 33.3 μs of each cycle. The code maps percentages to integers from 0 to 255, so 50 becomes 127, producing approximately half duty. All of these quantities describe the pin waveform. None yet tells me how many revolutions the blades make per minute.
程序最初把 PWM 设为 15 kHz,使用 8 位分辨率。按这个频率计算,一个周期约为 66.7 μs;理想的 50% 占空比,就是每个周期约有 33.3 μs 为高电平。代码把百分数映射到 0 至 255,50 会得到整数 127,对应接近一半的输出比例。这里算的都是引脚上的波形,还没有涉及叶片每分钟转多少圈。
The main loop also does not have to toggle the pin for every 15 kHz pulse. As the ESP32 LEDC documentation explains, a configured channel generates PWM at the selected frequency and duty. The program can wait before writing a new duty while the peripheral continues producing the previous waveform. How often temperature processing changes a setting and how long one PWM cycle lasts are two different time scales.
15 kHz 的脉冲也不需要主循环逐个翻转引脚。ESP32 的 LEDC 文档说明,通道配置好以后,就按设定的频率和占空比产生 PWM。程序可以隔一段时间才写入新的占空比,期间外设继续输出原来的波形。温度处理多久改变一次设置,与 PWM 一个周期有多长,分属两种时间尺度。
For the frequency itself, I would start with the particular fan's interface requirements. Noctua's microcontroller guide, for example, specifies a 25 kHz target and an accepted range of 21 to 28 kHz for its fans. It is a useful manufacturer example of what to check. The original program lets buttons change frequency in 200 Hz steps. Those steps change how often the waveform repeats; a proportional increase in fan speed does not follow from increasing that number.
频率该选多少,我会先查具体风扇的接口要求。以 Noctua 的微控制器接线说明为例,它给出的目标值是 25 kHz,接受范围为 21 至 28 kHz。这是厂商对其风扇的要求,可以拿来学习怎样核对接口。原程序里按键每次把频率加减 200 Hz,只是在改变波形的重复频率;把频率数值调高,并不等于给风扇增加了同样比例的转速。
Tachometer Interface and RPM Calculation测速接口与转速换算
An actual speed reading has to travel back from the fan. Noctua's PWM white paper describes an open-collector tachometer output producing two pulses per revolution on its fans. The internal output transistor pulls the signal low when it conducts. When it switches off, an external pull-up resistor brings the line high. A controller connected to that node can count the pulses produced as the fan rotates.
实际转速需要从另一个方向传回来。Noctua 的 PWM 技术白皮书说明,其风扇使用开集电极测速输出,每转一圈产生两个脉冲。风扇内部的输出晶体管导通时,把信号线拉低;关断时,信号线靠外部上拉电阻回到高电平。控制器接在这个节点上,就能数到随转动产生的脉冲。
I would choose the pull-up supply for the controller's logic voltage and give the tachometer output and controller a common ground reference. For a worked example, a 10 kΩ resistor to 3.3 V gives approximately 0.33 mA while the output is low. That calculation helps check the current, but resistor selection also depends on the allowed sink current and the signal's rise time. A larger resistance charges the line capacitance more slowly. Inspecting the levels and edges at the controller input would establish whether the signal can be read reliably.
我会按主控的逻辑电压选择上拉电源,并让测速输出与主控共用参考地。假设上拉到 3.3 V,电阻取 10 kΩ,输出拉低时的电流约为 0.33 mA。这个计算方便检查电流大小,实际选值还要兼顾输出允许的灌电流和信号上升速度。电阻太大,信号线上的电容充电会更慢;到主控引脚处观察高低电平和边沿,才能知道它能否被可靠识别。
Once the pulse count per revolution is known, the conversion is short. At two pulses per revolution, a 100 Hz tachometer signal represents 50 revolutions per second, or 3000 rpm. I explored pulse timing in the car power and speed-feedback note; the same counting idea applies here. I need the fan's own pulses-per-revolution value and must keep the tachometer frequency separate from the 15 kHz control waveform.
每圈脉冲数确定以后,计算就很短。按两脉冲一圈举例,100 Hz 的测速信号对应每秒 50 圈,也就是 3000 rpm。我之前在小车电源与速度反馈笔记里研究过脉冲计时,这里沿用同一个计数思路。要换成风扇自己的每圈脉冲数,并把测速频率与前面控制端的 15 kHz 分开。
Two fans introduce another wiring question. Both fan outputs in the schematic share PWM, so they receive the same control waveform. Reading each fan's speed would require separate tachometer inputs. Reasoning from the open-collector circuit, joining both outputs would let either one pull the shared node low. Overlapping pulses would no longer identify which fan produced them. Sharing a command is convenient, while observing each fan individually requires its own feedback.
两个风扇还会多出一个接线问题。原理图上的两路风扇输出共用 PWM,所以会收到同一个控制波形。若希望知道两只风扇各自的转速,就需要分别接收测速信号。按开集电极的工作方式推下去,把两个测速输出并在一起,任意一边拉低都会让公共节点变低,重叠的脉冲便无法分清来自哪一只。共享控制指令很方便,分别观察每只风扇还需要各自的反馈。
Duty Cycle and Fan Speed占空比与风扇转速
With a speed reading available, I could compare duty and rotation directly. I would hold supply voltage and PWM frequency constant, step through duty settings, and record speed after it settles to build a response curve for that fan. Low duty deserves a closer check. Starting from rest and reducing duty on a fan that is already turning can be recorded separately, so the curve also captures the starting and low-speed behaviour that matter in use.
有了测速读数,占空比与转速的关系才方便放到一起比较。我想固定供电电压和 PWM 频率,逐档改变占空比,等转速稳定后记录下来,画出这只风扇的响应曲线。低占空比处尤其值得单独试,从静止开始能否启动,以及已经转起来后能否继续降低占空比,可以分别记录。这样得到的曲线,也就包含了实际使用时关心的启动和低速运行情况。
The current program displays duty after Fan Speed and does not read a tachometer input. I would label that percentage PWM and add a separate RPM reading when speed sensing is connected. One shows the setting I sent; the other shows the fan's response. Both would be visible while adjusting the cooler, with each fan's operation available to check individually.
这版程序目前把占空比显示在 Fan Speed 后面,没有读取测速输入。我更愿意让界面直接显示 PWM 百分数,接入测速后再单独显示 RPM。一项告诉我发出了什么设置,一项告诉我风扇怎样响应。调节时就能同时看到设置和响应,也能单独检查两只风扇的运行情况。